GeoMaestro
Tutorial 8: Compositor basics
The Compositor is a tool with several levels of complexity. Here we start simple, and keep it simple till the end.
We will mainly see how to use the links and time stamps. No exotic boxes are introduced here: we will only deal with MIDI phrases. It is not even necessary to be aware of the GeoMaestro system, since in its simplest aspect the Compositor is just a mixer and has nothing to do with the GeoMaestro projection paradigm.
See at the end of this page for links to other Compositor-related tutorials.
One box
Open the Compositor (from the Tools1-> main menu); the main mouse mode should be "import box". This is how we add a new box to the composition.
Click anywhere in the graphic area: a pop-up window asks for a new box. This can be answered in many different ways. For example, any KeyKit expression returning a phrase will lead to the creation of a phrase (ph) box.
So enter this at the prompt:
'a,c,e'
Now you should see this:
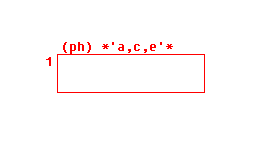
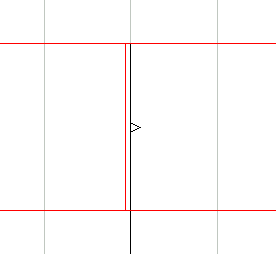
This is a box. So far, so good. Let's describe it in details:
- The number at the left is the box index. At any moment no two boxes have the same index, but you can not rely on it to permanently identify a box since some operations does change it. For example, if you have boxes 1, 2, 3 and delete box 2, box 3 will become the new box 2.
- The characters in parenthesis "(ph)" indicate the type of the box. See the list of types if you're curious.
- The string at the top is the box name: "*'a,c,e'*". The two "*" shows that this is a default name, built from the command we used to create the box.
- The box is red: this means it is selected.
Now let's see what the Compositor has to tell us about this box. Select the "infos" mouse mode and click in the box. At the console appears the following lines:
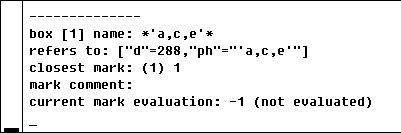
"refers to" displays the reference field of the box: here it says that it is the phrase 'a,c,e' and that its length is 288 clicks.
The next three lines gives info about the closest mark from the point I clicked. It is mark 1, it could be mark 0: all boxes at least have a mark 0, for the beginning of the box, and a mark 1, for then end of a box. Our box does not have any more marks.
The last line says that the box is not evaluated, so mark 1 is evaluated to -1. You can check that mark 0 is also evaluated to -1. Another way to describe this is to say that the compositor does not know "when" is located this box. Once it will know that, all marks in the box will be associated to a time value, their "evaluation".
OK, let's go then. Click on [EVAL]. This evaluates the so-called "current box", which in our case is box 1 since it's alone. Note that the current box is not necessary the same as the selected box (which is displayed in red). The current box is the one appearing in the boxes list menubutton:

(by the way, the [>] button makes the selected box, if it is defined, become the current box; this is useful sometimes).
A couple of lines have been printed at the console, and the evaluated phrase has been snarfed: it's 'a,c,e' (I hope you did not expect something different).
If you redo "info" query on box 1, you will see that now its two marks have values: mark 0 is at time 0 and mark 1 at time 288.
The box will retain these values until the next time it is evaluated.
Two boxes
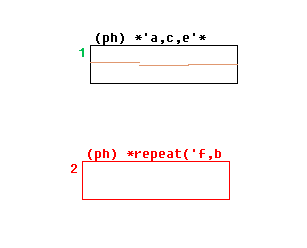
Now the are going to make a much more complicated composition ! Select again the "import box" mouse mode, and create a box with the command
repeat('f,b',5)
Since this is a KeyKit expression returning a phrase, we just created another (ph) box:
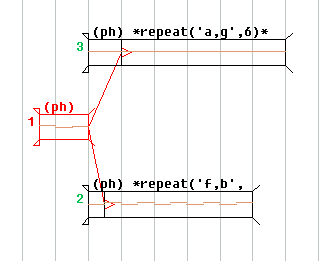
Now link the end of box 1 to the beginning of box 2 (in "draw link" mouse mode, which by default you can directly access with a Shift+Mouse1):
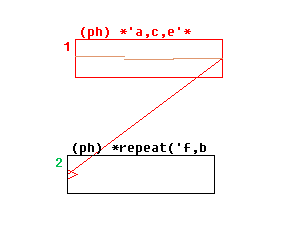
Click on [EVAL]: the resulting phrase is 'a,c,e,f,b,f,b,f,b,f,b,f,b'
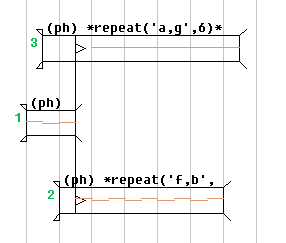
Now set the current box to box 2, with the menubutton:

Click [EVAL]: this time the result is 'f,b,f,b,f,b,f,b,f,b'. Evaluating a box makes it the starting point of the composition: here we evaluated box 2, and box 1 is thus ignored.
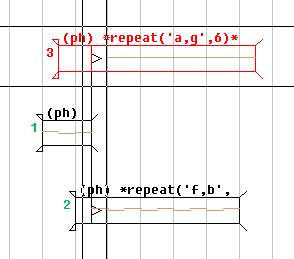
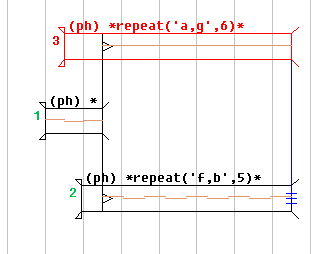
Three boxes
Let's add a new box:
repeat('a,g',6)
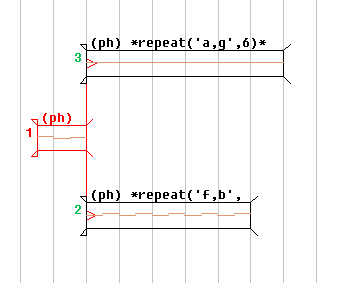
... and link it from box 1 like this:
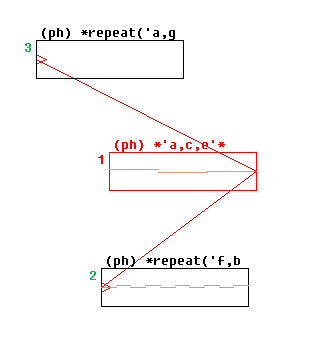
Evaluate box 1: the resulting phrase is 'a,c,e,f a,g b,f a,g b,f a,g b,f a,g b,f,b'
Since boxes 2 and 3 start at the same time (the end of box 1), their own evaluated values have been merged.
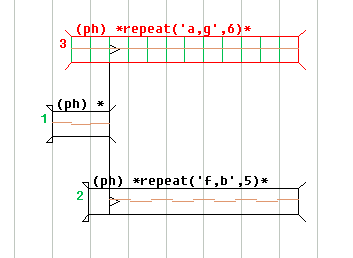
You may be confused by the fact that all boxes having the same size, and being scattered wherever you put them, it is not easy to see clearly the composition structure.
Well, this is a feature of the Compositor: its representation is symbolic, and the fact that you can choose the position and size of a box makes it possible to represent very clearly complex compositions with different time scales. At our level, of course, this is rather pointless. We could do well with an usual time line display.
As a matter of fact, such a display is available. Click on [SCA]. The display should become something like this:
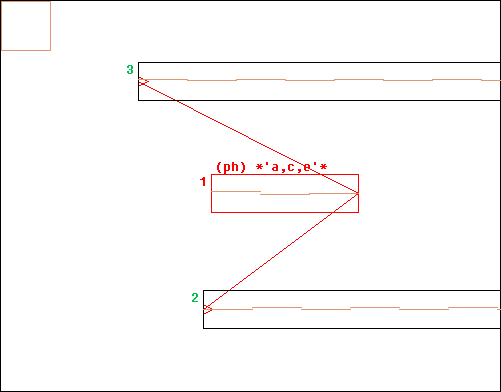
All boxes have been scaled relatively to box 1 (the current box). Since boxes 2 and 3 are much longer, they don't fit any more in the graphic area. Click in [auto] to adjust the display:
This is an intermediate mode: the lengths have been scaled, but the positions still do not reflect the composition structure. This is the default behaviour of the [SCA] button.
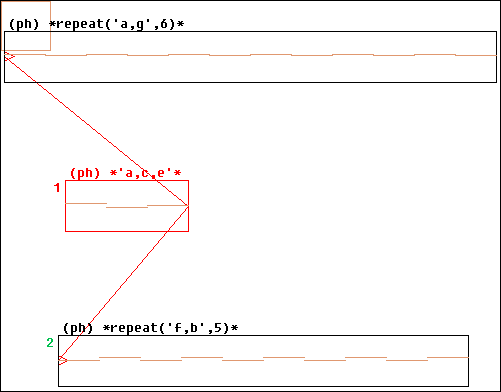
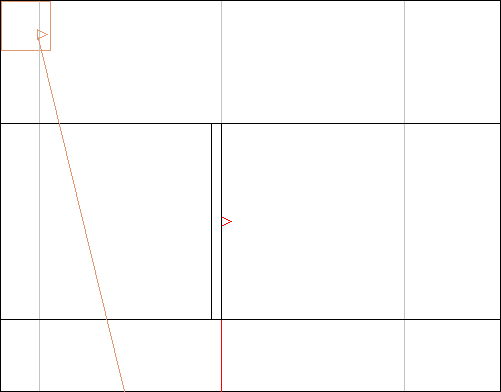
To have a full time line display, set the parameter ScaleToTimeLine to 1 (the fast way to do so is to type tTL at the console: this is a macro for time line toggle). Now do a [SCA] again, followed by [auto] and [zoom out] (it's nicer when boxes are not so large):
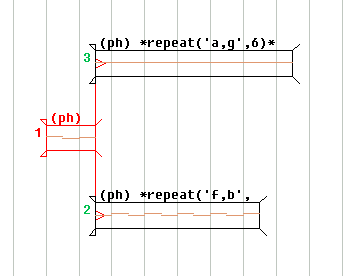
Note that the background grid is aligned with the beginning of box 1 because it is the current box, not because it is the starting box. To make this clear, set box 3 as the current box and click [SCA]. See how the grid shifted:
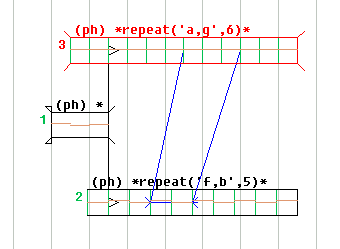
So far our boxes had only the default marks 0 and 1. Let's create new ones. Select the "plug-in" mouse mode, and the "NewMark" plug-in.
Just click once in box 3 (if you drag the mouse, the plug-in will let you define the mark position with the mouse; but here we want an accurate setting). At the pop-up prompt ("position..."), type:
1/6.0
since box 3 is 6 seconds long, this created a mark at one second after the box beginning. Note that 6.0 in required, because 1/6 would be rounded to 0 (this is KeyKit syntax for "/" division).
Then click in box 2 and type:
seconds(2)
... this created a mark 0.5 seconds after box 2 beginning. Why ? Because seconds(2) is more than 1. If you give a float from 0 to 1, the NewMark plug-in understands it as a relative position within the box; if the number (or expression) you enter is more than one, the plug-in takes it as an absolute time value, in clicks.
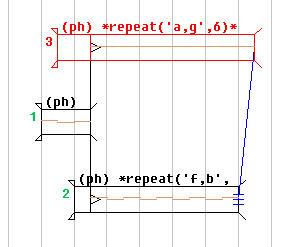
So now we have two new marks to play with. Let's link the boxes like this:
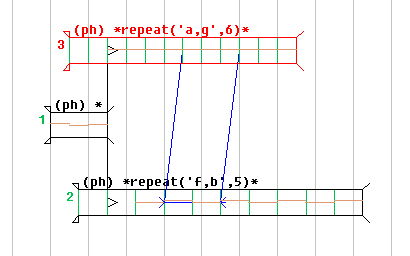
Set back box 1 as the current box. Click [EVAL] then [SCA]. The composition now looks like this:
... when a link goes into a box, only what comes after its location is evaluated. So we end up with the two first notes in box 3 ignored, along with the first note in box 2.
Actually, this is what we wanted, but not what we got ! The first three notes in box 3 are skipped: this is because our 1/6.0 being approximated to 0.16667, the mark happens slightly after the beginning of the third note, which is enough to have it ignored. We should have typed something like
1/6.0-0.001
How do we correct this ? There are many different ways to handles marks, which I will not introduced here. Instead, we will see how to use existing marks when it does not seem obvious at all.
So let's define the right mark: with the NewMark plug-in in box 3, create a new mark at
1/6.0 - 0.0005
... you will not see very much difference in the display: the two marks are much too close. Let's zoom: use the "zoom" mouse mode and select a rectangle like this:
... now we can see the two marks:
Ok, we just have to link box 1 to the first one instead of the second one.
Trouble: box 1 is far away from view with such a zoom, and without zooming we can not tell which mark we target when drawing a link.
Click [UNDO] to cancel the zoom, and have the three boxes in view. Now draw a link from the end of box 1 to anywhere inside the small upper left brown square: this is a docking area for links. The link should stay there, like this:
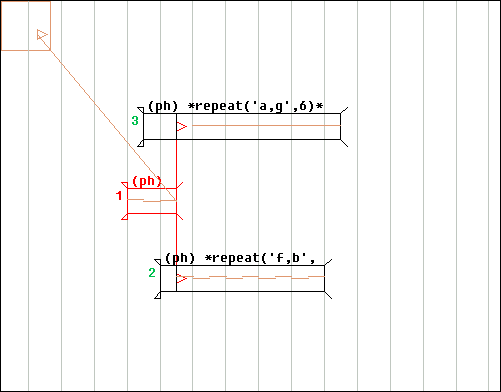
Now zoom in again:
Because the docking area escapes any change of display, our link is still there, available. Go back in "draw link" mode, click on the link triangle and drag it to the first mark. That's it. Click on [auto] then [zoom out] to get back the previous view.
Then [EVAL] and [SCA]: this time only the two first notes of box 3 have been skipped.
Frankly, this is a very akward way to do precise work with marks, but it allowed us to introduced the docking area, which is a very useful feature.
Time stamps
Now suppose we want to have music from box 2 and box 3 end at the same time. We need to adjust the tempo of one of them... a very boring operation. This is what the Compositor is very good at; in fact, this kind of operation is the Reason for its Existence.
We simply need to draw a time stamp from the end of box 3 to the end of box 2, like this:
This is mark 1 from box 3 saying to mark 1 from box 2: "you must happen at the same time as me"
[EVAL] then [SCA]:
... box 2 as been stretched so that its end in now synchronized according to the time stamps. Of course another way to have the boxes synchronized would be to create a stamp from box 3 to box 2: this would compress box 3.
Now for another type of synchronization: let's arrange the boxes so that 2 notes in box 2 plays exactly for the duration of 3 notes in box 3.
We will need more marks: let's create them with the MarkIf plug-in.
First of all remove the time stamp by switching to "del time stamp" mode and clicking on the three segments at the end of it.
Then make box 3 the current box and [EVAL]uate it: this cancels the effect the link from box 1 had in the previous evaluation. Then switch to "plug-in" mode, set the plug-in to MarkIf, click anywhere in box 3 and enter
1 "c6"
... this means that for each note in box 3 we mark its starting time if the test "1" returns 1: this being always the case, all notes give birth to a mark. The second part, "c6", says that the marks should be displayed in green. More about this here.
So this is what we get:
Note (which you can skip): did you notice that box 3 is not displayed the same ? the two small triangles at the left corners are not here anymore; this is because the box is not anymore at its right place in the time line display, since it is starting at time 0 (that's because we just evaluated it). The remaining diagonal segments at the corners indicate that the box still has a correct length, though.
Now do the same thing with box 2 (don't forget to evaluate it). Then draw a time stamp going from any green mark in box 3 to a green mark in box 2, for example like this:

... then draw a second time stamp going from the mark three notes away in box 3, going to the mark two notes away in box 2:
This is box 3 saying to box 2: "this duration I'm showing you should be the same as mine". I call this a time scale stamp.
Set box 1 as the current box, [EVAL] and [SCA]:
More about the Compositor
Let's stop this tutorial here. You are now able to arrange a bunch of MIDI phrases... this is a very basic usage of the Compositor. If you want to see more of its capabilities, have a look at the following tutorials:
-- Back to the tutorials index--
-- Back --