GeoMaestro
The Compositor tool
Principle
Description of the tool
Importing a box
Links and time stamps
Iterative evaluation and (&&) boxes
Time line mode
The boxes menu and its associated buttons
Other buttons
Managing marks
Annexes:
This tool is a complement of GeoMaestro main GUI, and as such it is often interesting to have both of them open at the same time, which is what the Wrapper Tool is intended for; you'll find it at the ">>GM Wrapper" entry in the Tools1 menu.
You will then have both tools integrated in one; move from one to the other with the upper [toggle] button, or type "gTT" at the console (it's a macro).
Principle
This tool is an organizer of musical fragments. You can use it to assemble many different bits of music into very complex compositions; "fragments" and "bits of music" here refers either to MIDI phrases, Csound scores or plain audio files.
This tool is NOT an algoritmic block-based environment; it is only a sophisticated kind of mixer, mostly useful as the last step in a compositional process, when already processed musical parts and structures are to be blended together. But since we are in KeyKit, it still preserves a lot of flexibility (like the possibility of seamlessly embedding KeyKit tools). It also have some audio synthesis and DSP capabilities, thanks to its interfacing with Csound, so that you can actually use it to produce audio files.
Phrases, lignes and audio files are loaded into boxes; each box has a set of marks, which are relative horizontal places (between 0 and 1) in the box. For example, a mark at 0.5 is at the middle of the box. As long as a box has not been evaluated, it doesn't have a specific starting time nor length. When a box is evaluated, each one of its marks get attributed a corresponding evaluated time.
Although marks are set automatically in a number of cases, they can be edited manually in a comprehensive way (see here for more)
Boxes are arranged together in two fundamental ways:
- First we have links. A link goes from one mark in a box to another mark in another box. When the first box is evaluated (which is the operation by which it returns a phrase and/or a Csound score), it includes (merges) at the starting mark point the linked box, which will be evaluated from the target mark on. In its more simple aspect, it simply means that you can add boxes by linking the end of one box to the beginning of the next one.
- Second we have time stamps. This is a kind of link going from one mark in a box to another mark in another box, and stating that both marks should happen at the same time. The direction of the stamp says which mark is setting the time value of the other one
Here is an example:
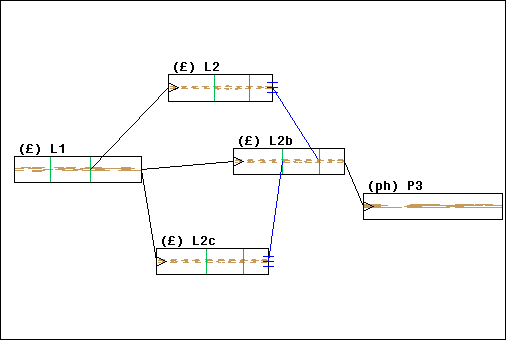
The boxes labelled (£) refer to lignes; the (ph) one to a phrase
The vertical green segments are marks; the black arrows are links; the blue lines are time stamps.
In this example, there is a tree structure; evaluating the boxes P3, L2 or L2c will simply returns the phrases from theses boxes, because there is no link going out from them. Evaluating L2b will return the phrase in L2b plus the phrase in P3, because of the link going from the end of L2b to the beginning of P3. Evaluating L1 will return the phrases from all boxes. Let's see the way they will be arranged:
First we will have L1 plus L2b plus P3; the phrases from theses boxes will be added, without modification of their lengths. Like this:
[L1--|--|---][L2b---|--|--][P3----------]
Then, L2 will be merged, from the point corresponding to the second mark in L1 to the point corresponding to the second mark in L2b, because there is a time stamp saying that L2 should end there (whatever is its starting time). So L2 will be stretched or extended in order to fit where it should go:
[L1--|--|---][L2b---|--|--][P3----------]
        [L2----|---|---]
Eventually L2c will be merged, from the end of L1 to the first mark in L2b:
[L1--|--|---][L2b---|--|--][P3----------]
        [L2----|---|---]
             [L2c---]
So arranging the boxes means giving a logical organization to their content. If no time stamp is used, it is a way to say where the phrases should be merged one into another. With time stamps, it is a way to say how they should be synchronized, using tempo changes if necessary (or pitch shifts for audio files).
It may not be possible to obey the time stamps; in that case an error will be signaled when evaluating.
You will find a more detailled discussion of links and stamps below.
Description of the tool
Here's a screen shot of the tool (the image is clickable):
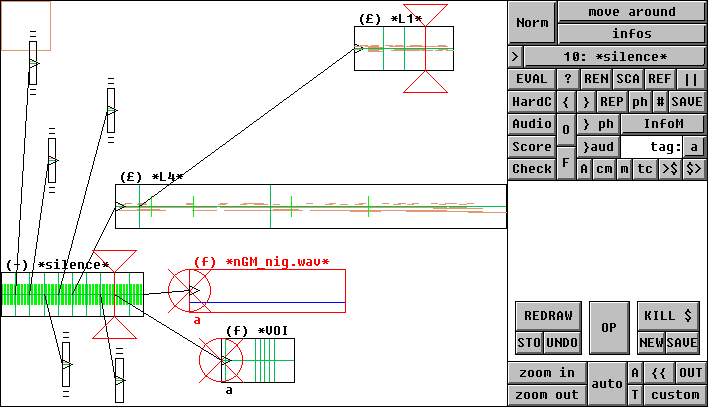
The mouse is used in the same way as in the main GUI. Here are the mouse modes:
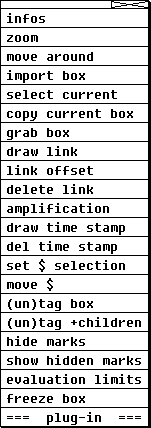
infos gives the name of the box and the variable it represents; it also describes the mark you clicked on (or the closest one if you didn't target a mark) .
zoom and move around work almost exactly in the same way as in the main GUI, the only notable difference being that the x/y ratio is not maintained while zooming.
you can use grab box to move a box; the currently grabbed box is displayed in red: note that this does not make it the "current" box (which is selected from the boxes menu). If you grab the box around its right end, instead of moving it you will change its length; this does not change anything to the content of the box: it is simply a display feature. Generally, boxes are not scaled, so that you can't tell how long they last (music-wise) from their rectangular length. You can force scaling with the [SCA] button, but this will only give a correct result on evaluated boxes.
draw link and del link: to create a link, drag the mouse from the starting mark to the target one. To remove a link, click on its ending arrow (triangle). Only one link shoud target a given box (while many links can be issued from a box), otherwise a loop will be created in the link structure, and the evaluation will fail (see [EVAL]).
link offset: use this mode to separate the triangle from its original segment (in a link): the segment refers to the time synchronisation, while the triangle refers to the starting point in the box. In a basic link both are the same (see here for details)
draw time stamp and del time stamp: you can create a time stamp the same way as you create a link. To delete a time stamp, just click anywhere in the corresponding box. When two time stamps are targetting the same box (wherever they come from), they are grouped together to form a "time scale" stamp, which is an alternative way to set the musical length of the box (see here for details)
Note that, as it is not always easy to connect two marks without zooming and/or moving the display, you can use the upper left brown square to temporarily hold your links and time stamp. Any number of potential links/stamps can stay there for as long as you want. To remove a link/stamp without actually connecting it, simply drag it out of the square
import box: click anywhere to create a new box. A pop-up window will ask you for the type of box you want; since this is a rich topic a whole chapter is dedicated to the import procedure
select current : click on a box to make it the current box.
copy current box: click anywhere to create a copy of the current box, that is the box selected in the boxes menu; the links and time stamps are not copied.
amplification: click inside a box and drag the mouse to set the level of amplification for this box (it appears as a blue line). Default level is 100%, which appears as a green line. The amplification range is set by the parameter COMPOMAXAMP, which by default is 2: range is 0 to 200%. Use the [A] button to toggle the display of the amplification levels for all boxes on and off.
Note: you can set the amplification level for a compacted box. It will effect the whole structure it represents, as an extra amplification factor. This is also true for (h) and (s) boxes.
Another note: by default, csound scores are not amplified, since there is no standard way to do so. Use the box "scoamp" field to define an amplification procedure; more about this here.
set $ selection: clicking in a box toggles on/off its belonging to the "$ selection"; the button [KILL $] deletes all boxes in that selection. Use the [T] button to toggle the display of the tags ($ is the specific tag associated to KILL and move, but you can have up to 52 different tags to form groups of boxes; this is not fully implemented yet)
move $: click and move at once all the boxes belonging to the $ selection
(un)tag box: tags the box you click in with the current tag.
(un)tag +children: tags the box you click in and all its children with the current tag.
hide marks and show hidden marks: (not documented yet)
evaluation limits click on a mark to create a limit (represented by two red triangles), or click anywhere in an empty place to remove both limits. If the two limits already exists, the one you're setting will replace the last one. When two limits are set, evaluating a box works as usual, but the eventual result is cropped (and its starting time adjusted) so that you only get what happens between the limits. If only one limit is set, the second one is supposed to be at one minute after the end of the composition, providing a comfortable decay period for the last notes.
While this feature is mostly intended to make it easy to listen to only a part of a composition, it can also be used with echo boxes to separate source boxes from their echoes in algorithmic set-ups
freeze box: click in a box to freeze it, along with its children. A frozen box keeps its previous evaluation when an [EVAL] is performed. This makes it possible to avoid calculating again and again a part of the composition structure which is kept unchanged. Clicking in an already frozen box does nothing, except if it is the upper parent of a frozen tree: in this case all boxes in the tree go back to a normal behaviour. Note that this also happen automatically if for some reason the evaluation data gets lost.
Note: you can set the "autofroz" field of any box so that it automatically get frozen after its evaluation. See the chapter on iteractive evaluation for more about this.
plug-in: the plug-in system works the same as in the main GUI. The plug-in menu button is located just above the tag one; see the plug-ins reference section for details.
Importing a box
The "import box" mouse mode is the one and only way to add a new bow into your composition. Click anywhere in the graphic area; you will be prompted for a box type.
In the following, I will at the same time describe the different types of boxes, their meaning and usage, and how to create them, that is: what should be entered at the prompt when using the "import box" mode. A reminder is available at the console if you type "?".
Note: custom shortcuts or alternate syntaxes can be defined by hacking the Compositor_import_shortcuts() function in lib/lib_compo.k. Type "??" for a list of provided shortcuts (at the console). All of this is documented in the Compositor importation shortcuts reference page.
Here is a summary of the different types. Click on the links for more, or simply read on:
Types of boxes
- (-) silent boxes (for time framework and delays): to import one, simply enters an integer at the prompt, or any KeyKit expression returning an integer. This will be the length of the box, in clicks (use the
seconds() function to convert seconds to clicks, or see the - shortcut)
- (£) lignes: enter a valid ligne name (that is, the name of a ligne already defined), or any KeyKit expression returning a ligne. Lignes may contain Csound scores: they will be taken into account.
- (ph) phrases: enter a phrase variable name, or any KeyKit expression returning a phrase, or "m" for a midi file
- (T) KeyKit tool: enter the name of a tool class (like wgroup for a group tool)
- (f) audio files: enter "w" then use the browser to select the *.wav file
- (&) echo boxes: enter "& n m" where n and m (optional) are the sources indexes; enter "&& n m" for iterative processing.
- (C) Csound score: enter a valid score name (that is, the name of a score already defined), or any KeyKit expression returning a score.
- (h) score header: enters "h", "hf" then use the browser to select the *.sco file, or enter "hv ...", or enter "orc" and select an orchestra
- (s) MIDI synth: enter "s n" where n is the synth index, then give a root string for temporary files names
- (0) black hole: enter "0"
- (x) Csound effect: enter "x n" where n is the effect index
- (#) wave renderer: enter "#"
- *.box file (the Compositor file format): enter "b" then use the browser to select the *.box file
silent boxes (-)
You import a silent box by entering its duration (in clicks). It can be any KeyKit expressin returning an integer, like
seconds(10)
... which will create a box 10 seconds long.
This type of boxes is used to insert silences (delays) or to provide anchoring points in a time framework. It comes with marks every second and every tenth of seconds (only if the duration of the box does not exceed SILENCEMARKS seconds); it is not supposed to be longer than a few seconds, since you can expand it with time stamps (see the following example)
Here is an example of time framework built out of three silent boxes:
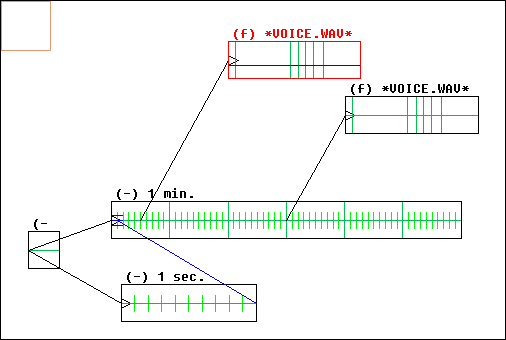
The first one (small square at the bottom left) is the departure point: it is the box that will eventually be evaluated. It is a silent box whose duration doesn't matter, used to trigger simultaneously the evaluation of two other silent boxes. The longest one had a declared duration of seconds(6), but since it has a time stamp from the shorter one, of duration seconds(1), it is expanded and its actual duration is one minute: small marks are separated by 1 second, large ones by 10 seconds. The names of the boxes have been set (with the [REN] button) so that we don't get confused.
To make the trick clearer, here is a zoom on the time stamp:
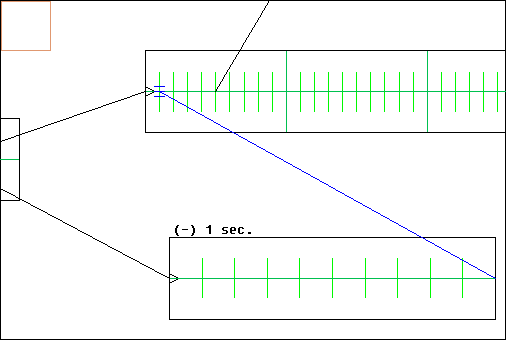
Now we can use the long silent box as a time framework covering the range 0 to 60 seconds. In the example, the two audio files will be played at 5 and 30 seconds (the blue line in the first one shows a level of amplification of about 70 %)
Note that, although the marks are 1 second apart in the long box, the precision we have can be much greater: we simply have to use another silent box of duration 1 second to have a 0.1 second precision anywhere we want. In the following example, the second audio file is now played at 30.3 seconds:
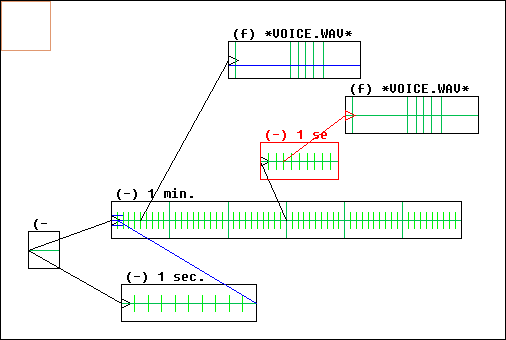
... and here, with the help of another scaled box, the starting time is now set to 30.34 seconds:
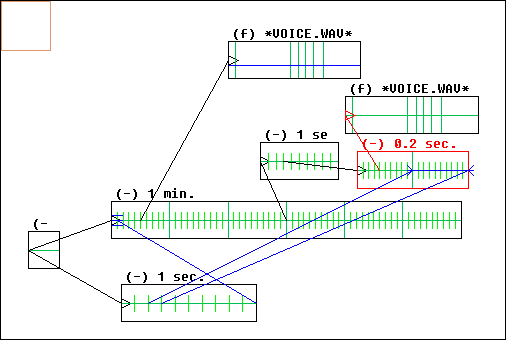
So this game of building time frameworks out of silent boxes is very flexible and powerful, and allows for long and complex compositions where different time scales appear simultaneously, where we need them.
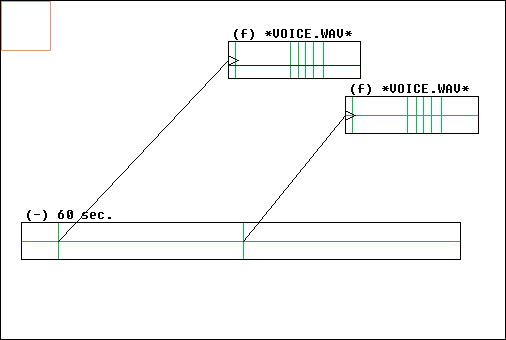
Note that is is also possible to directly import a silent box of duration 60 seconds (which won't have automatic marks, though, these being provided only up to 30 seconds by default), and use the [||] button to create two marks at times 5 and 30.34 seconds. While this looks much simpler, it is also less flexible:
phrases (ph):
You import a phrase box by entering a valid phrase variable name or any KeyKit expression returning a phrase (a MIDI file can also be imported by entering "m" and choosing the file with the browser); the following shorcuts are defined:
pac 5 6 14		# patches ("PAC") for channels 5, 6 and 14
pan 5 63 6 127 14 0	# pan controllers and their values for channels 5, 6 and 14
Marks are automatically created from SYSEXTEX "m" messages; for example, the phrase
'a,"m",b,"m",c'
... will define a box with marks at 1/3 and 2/3 of its length.
Comments (see here for the meaning of marks comments) can be defined in the SYSEXTEXT:
'a, "m c6 |a", b, "m c7 |1", c'
Unfortunately, you can not use double quotes in the argument of the "import box" parameter. So you'll have to define the phrase at the console, as a phrase global variable, and use this name at the prompt.
(You can also use the MarkIf plug-in to create marks in an existing (ph) or (£) box at the beginning of each note for which a given test expression is true.)
Note: Using the Group Tool to add marks to an existing phrase:
snarf your phrase, then File > Read > Snarf and View > Tracks > All, then set
Snarf = '"m"'
and use the Paste > Snarf mode to create a mark by clicking where you want it to be, then get the phrase back into Snarf with Trk 1 > Snarf > All, (or from the root menu: Windows -> Snarf Phrase with a click in the group tool)
Alternatively, you can also directly import a group tool as a (T) box, create a new blank track in it and paste your marks there. This is much more flexible for testing different positions. When you're done, click on [ph] to get rid of the group tool and have a plain (ph) box.
When a phrase box is defined by an expression, it is updated every time the box is evaluated; but the marks positions are only updated if you do a [REF] to refresh the box. If the box has not been refreshed, the updated phrase is used, with the older marks (and don't forget that marks positions are relative, so if the new phrase has a different length, the marks time values do change even though their positions don't)
Another important thing to understand is that the length of the box is set by the length attribute of the phrase. This explains why you can have notes displayed outside the box: this happens when
latest(ph) > ph.length
KeyKit tools (T):
You can import a new tool by giving the name of its class. You can also import a copy of an already existing tool instance by giving its id number (which starts with a "$"); it will be restored in its current state within the Compositor.
The tool must have a method whose return value is a phrase or a ligne. Use the "reference" item in the EditFields plug-in menu to set the method you want to call (item "(T) set get method"); by default it is .get(), which works fine with all tools responding to Window -> Snarf Phrase in the Root menu (like wgroup, wkboom, wcurve... and many others: see below for a more comprehensive list).
This method will be called immediately when the tool is first imported. To speed up the importation procedure, the Compositor first check if a .get_dummy() method exists, and if it is the case, it calls it instead of the regular one. The Toys use this mechanism, since their algorithms may be quite long to execute.
Still with EditFields (through item "(T) length is..."), you can also define how the box length will be calculated:
- if the field
"length" is 1, it will be the .length attribute of the returned phrase.
- if the field
"latest" is 1, it will be the ending time of the last note in the phrase.
- if both fields are 1, it will be the largest of these two values; this is the default setting.
Before applying default settings, the compositor checks if the tool class is registered in the ToolsToGMCompo array (defined in the lib/initialisations.k file). If they are, it will look for settings there.
To access the tool, make its box be the current one then click on [REF]: the whole graphic area will be dedicated to the tool. Click on [REF] again to hide it back.
Note that the Compositor will not accept tools who do not have a .dump() method. And, needless to say, it should have a corresponding and working .restore() otherwise trouble is to come.
Here is a list of tools you can import (it's from tools1.lst and tools2.lst). Remember you must give the name of the class, not the menu item (eg. "wexpresso", not "Expresso"):
Toy:wGMtoy		# see here for details
Blocks:wblocks
Controller:wcontrol
Group:wgroup
Kboom:wkboom
Kboom2:wkboom2
Bargen:wbargen14
Snarf Box:wsnarfbox		# (from GeoMaestro distribution)
Clavier:wclavier		# (from GeoMaestro distribution)
Drum Picker:wdrumpick		# (from GeoMaestro distribution)
Ctrl Shaper:wctrl		# (from GeoMaestro distribution)
Pitch Bend Shaper:wpbshaper		# (from GeoMaestro distribution)
Riff:wriff
Apply:wapply
Boomix:wboomix
Curve:wcurve
Expresso:wexpresso
Fractal:wsimfrac
Fractal Nest:wsfnest
Markov Maker:wmark
Raw Phrase:wrawtophrase
Roller:wroller
Sectionalize:wsect
Techno:wtechno
Techno2:wtechno2
Techno3:wtechno3
WWWtools:wwwtools

Customization tool:wcustom 	# (useful to have around)
See tutorial 12 for an example.
lignes (£):
Lignes are the result of projector calls; there are three particular ways in which they differ from phrases:
- they usually do not contain bank/patch messages (only the ones possibly coming from an event nodur)
- they remember the structure of the projector and provides marks at the corresponding points
- they can embed Csound scores
As far as the Compositor Tool is concerned, existing lignes can be used even if no event scene is defined; but then you can convert them to phrases (see the [ph] button). Much more interesting is the use of lignes while the main GUI is available so that you can experiment with them.
For example, let's say we want to import the following line:
Duration = 0
NSeg = 4
Echelle(Oi,Oj,Oim,Ojm,NSeg,Duration)
... type the two first commands at the console then enter the last expression at the "import box" prompt . The calculation of Echelle(...) will be done every time the box is evaluated, so we can play with the two parameters NSeg and Duration
The box will looks like this (it's been [REN]-amed to "example"):

The marks appear at the end of each Ecoute() segment (there are four of them in the ligne).
Now if you type
NSeg = 10
and do a [REF] to refresh the marks positions, the box will become:

The marks are still at the end of each Ecoute() segment.
Note that marks are also generated from SYSEXTEXT messages in the "ph" field of the ligne (see phrase boxes for details)
You can set (at the console) the LIGNEDEPTH parameter so that the analysis goes more or less deep into the ligne structure. Default is 2; if set to 0, no mark will be created from the structure: only the SYSEXTEXT messages will be taken into account.
Also, some projectors (such as Batteur) directly define marks within a "m" field in their output ligne. This is taken into account by the Compositor (see here for an overview of the different ways to define marks).
Now for the patches: in GeoMaestro, the channel ch is associated to the patch Ev[ch]["PAC"]. This is what is set with the GUI in the [fn] mode. So if you want the ligne in the compositor to be associated to the same patches as it is in the overall system, you must link it to a phrase box containing the "PAC"s. Two functions are useful here:
InitPAC()	# return a phrase containing the bank/patches messages for all channels
		# import shortcut: "pac"

EvPAC(...)	# returning the same thing, only for specific channels
		# ex: EvPAC(1,2,15)
		# import shortcut: "pac 1 2 15"
If we create a new phrase box with the argument
InitPAC() # ...or simply "pac"
... then link it to the previous one this way:

... evaluating the phrase box will return the ligne on the current patches. If you change them, for example at the GUI using the patchmap menu, it will be taken into account at the next evaluation.
Now, once you get something you like, with the good patches and the good parameters, you can do a [ph] on the two boxes: the current expressions will be translated to phrases independent from the changes in the GUI. This also applies to the RL array: if you imported a ligne from this array, say ligne 5:
RL[5]
... then everytime you [redo] the ligne, you can evaluate the box(es) and hear the changes (for the marks to be updated, you still need to [REF]-resh the box).
And once the ligne sounds fine to you, use [ph] to "freeze" it, so that it is not dependent any more on the RL array.
Lastly, what happen to Csound scores in a ligne ? Nothing special: there are processed like the MIDI part of the ligne, stretched or extended if time stamps require it, and organised according to the links. Only the amplification factor is not applied, since there is no convention allowing to recognize the amplitude in a Csound score: it depends on the orchestra.
If no header score box is present, the score will be returned by the [EVAL]-uation procedure: click on [Score] to see it, edit it or save it under a new name (it uses the default name defined in CS_SnarfFile).
Csound score (C):
As for phrase and lignes, you import a score box simply by entering a valid score variable name or any KeyKit expression returning a score. See the Csound related page for details about scores format and associated functions.
To import a score from a *.sco file, use the shortcuts
sco {fname}		# keeps only the i-statements in the score, without comments
xsco {fname}		# reads the full score, with no modification
(if no fname is given, a browser window opens; otherwise, fname is supposed to be in the DATA directory)
The resulting (C) boxes actually simply refer to the external file: so any change in this file is taken into account at the next evaluation (and if the file does not exist any more, you will get an error)
It is also possible to import the score so that the file is read once when creating the (C) box, and the correponding score is then kept in memory. to do so, use the following shortcuts:
isco {fname}		# same as sco, without referencing fname
ixsco {fname}		# same as xsco, without referencing fname
The scores in the composition can be rendered in two ways: by header score boxes, which dumps the score of their children and use a specific orchestra to render them with Csound. Or by default (for what I call here the main score), in parallel with MIDI rendering, with the orchestra defined in CsoundOrchestra or, if it is "" (default), with the orchestra defined in Ev["orc"]. In-depth explanation of the rendering to audio process can be found here.
Setting marks:
marks are automatically created from comment messages in the score: use ;m; or ;m2; to create a mark for the time corresponding to the p2 field, use ;m3; to create a mark for the time p2+p3. Examples:
i1 11.5 0.25 2000 10 ;m; c7 |a 	# mark at t= 11.5 seconds
i1 12 0.25 2000 10 ;m2; c7 |c hello	#  mark at t= 12 seconds
i1 12.25 0.50 2500 9.8 ;m3; c6	# mark at t=12.75 seconds (p2+p3)
... see here for a description of the mark format.
Allowing amplification:
By default, amplification has no effect in a score box.
You may allow this by setting the "scoamp" field of the box (for example with the EditField plug-in)
Its value must be a KeyKit expression returning a score, where the keywords "_sco_" and "_af_" will be replaced by the current score and the amplification factor, respectively.
For example, setting the "scoamp" field to
AmpScore(_sco_,_af_,8)
will amplify the score by scaling all p8 in it. This is a simple example; in most cases you will probably have to write your own amplification function.
audio files (f):
No much to say here... type "f" and chose a *.wav file with the browser. Format must be 44100 Hz in 16 bits, RIFF WAVE. The file will be processed by the diskin Csound opcode (see here for details on audio processing).
If you want marks to be automatically associated to an audio file, you have to create a text file defining the marks. It should have the same name as the *.wav file, with a .dat extension, and be located either in the DATA directory or in the same directory as the *.wav.
Here is the format (example file here):
Each line must display three fields separated by spaces or tabulations:
- first, the mark number (0 and 1 are reserved for beginning and end, do not use them)
- second, its position in seconds
- third, its associated comments, between double quotes
score header (h):
This type of box is used to dump a Csound score: it associates the score lines generated in lignes (or from score boxes) to an external *.sco file containing the header part of the final score, and so creates a full score ready to be processed by Csound. If the header file is called example.sco, the produced score will be called example_.sco (so that the initial file is not overwritten).
You import such a box by typing "h" at the prompt and typing "*" to choose a *.sco file in the browser, or by giving a valid score variable. The file (or variable) you're choosing should contain the header part of the score (table definitions, etc...): everything before the first i-statement will be loaded, everything else will be ignored. Also, if you want the score to be automatically processed (see here for more about this), it should have the associated orchestra filename in its first line, as a comment. For example, it could be:
; mandol.orc
;-----------------------------------------------

f37 0 8192 1 "mandpluk.wav" 0 0 0
;-----------------------------------------------
(Do not give a full file name with path: all *.orc and *.sco files are supposed to be located in the DATA directory if you want to have them processed by GeoMaestro).
Note: if you simply press RETURN at the "Header > " prompt, a dummy header box will be created. It will simply dump the score to nowhere, acting partly as a black hole. This may be interesting for some echo boxes set-ups.
You may want to include i-statements in your so-called "header" file. In that case, uses "hf" instead of "h" when importing the box: the whole referenced score will be included.
If the header is not located in a file, but instead is to be evaluated from a variable or any KeyKit expression, use the "hv exp" syntax to import it. This also allows dynamic settings for (h) boxes: see the "htoy" shortcut for an example
Alternatively, if no header is necessary, you may use the "orc" syntax instead of "h" to directly specify the orchestra to be used. This will be internally converted into a score header made of one single comment line giving the orchestra reference (as the first line in the above example)
The header box belongs to a class of boxes whose behaviour is very different from the one we have seen so far. These boxes (MIDI synth, black hole, wave renderer, ...) somehow act in behalf of all their children in the evaluation process. Their action is as much dependant on their logical position in the composition graph as on their evaluated starting time.
In the case of an (h) box, the content of the dumped score will come from the chidren of the box, not from all the boxes following it time-wise. This is best illustrated by an example:
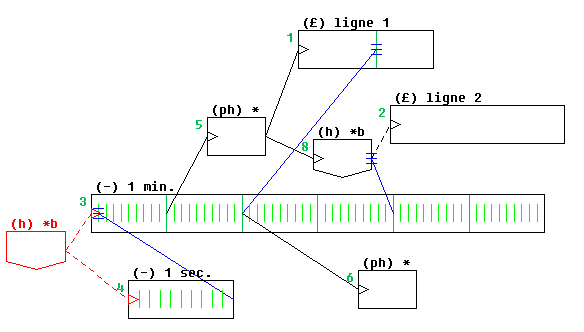
Here the two (ph) boxes contain two different sets of patches (see ligne boxes for more), and the two (h) boxes also refer to two different header scores; we will suppose that both "ligne 1" and "ligne 2" contain both MIDI and score data.
Now let's say we evaluate the first (red) box.
If you look carefully to the time stamps (blue lines), you can see that the first half of "ligne 1" uses the upper set of patches, while the latter half uses the other one; "ligne 2" is enterely played with the second (bottom) set of patches. This is simply because all MIDI notes are merged, so it doesn't matter on which branch of the tree structure a program change message is issued: the only pertinent thing is when it is issued.
(NOTE: Of course the tree structure does matter: if you evaluate the upper (ph) box, both "ligne 1" and "ligne 2" will have the same patches, since the other (ph) box doesn't appear at all there; but this will only be possible if the "1 min." silent box have been previously evaluated, otherwise the time stamp it issues would be undefined... evaluating part of a composition can be very tricky, at times)
On the other hand, the score header boxes collect all score data issued by their children boxes: here we have to look at the tree structure to understand what is happening.
In our example, evaluating the red box will lead to the creation of two Csound scores: the first one (time-wise) from the red box, with the score in "ligne 1", the second one from the other (h) box, with the score in "ligne 2". Even if the score instructions where happening at the same time, they would eventually belong to two different files (and maybe two different orchestras) if they're not dumped by the same header box.
If you only use one orchestra within your composition, it is of course simpler to put the header score as the first box in the composition, parent of the whole tree, like the red box in this example.
Note that if no header box is present in the composition, the [Audio] button will process Csound scores with the orchestra defined in CsoundOrchestra or, if it is "", in Ev["orc"]; if no orchestra can be found at all, you will have the score available through the [Score] button, completed by the default header stored in Ev["score"]
MIDI synth (s):
In the same way as the score header boxes, the MIDI synth one dumps the MIDI phrase from its children, and use a specified soft synthetizer to render it as an audio (*.wav) file. This way, you can have different MIDI parts in your composition be rendered with different synthetizers (which can be different Csound orchestras for MIDI, or different batch files defining specific settings for TiMidity, or simply other programs). Only if some MIDI notes are left at the end of the process will they be rendered by the standard synth which is TiMidity; this is called "main MIDI" in this manual (see Audio Rendering for details)
In order to be available to the Compositor tool, a synth must be registered. This happen in the RegSynth() function coded in the userlib/synths.k file
Each synth is registered in a field of the RegSynth() array. For example, in the default distribution you can see:
	 3 = ["n"= "CSound plckmid",
	      "c1"= "MIDIsynth.bat ",
	      "c2"= "  plckmid.orc GMplck.sco ",
	      "c3"= " ",
	      "mdir"= "",
	      "wdir"= SSDIR],
In there, the "n" field is the name of synth number 3; to invoke it on a midi file called midif of duration dur for a resulting wav file named wavef, the Compositor will use the following KeyKit command:
system(c1+wdir+wavef+c2+mdir+midif+c3+dur)
... where c1,c2,c3,wdir and mdir are the corresponding fields in RegSynth()[3]. The names midif and <B>wavef do not contain the path, wdir and mdir are used for that
So in our example and on my system, the file "example.mid" of duration 57 seconds will be rendered in file "result.wav" by the command:
system("MIDIsynth.bat C:/Csound/Samples/result.wav plckmid.orc GMplck.sco example.mid 57")
Of course you have to custom the RegSynth() array and/or write your own batch scripts so that if works on your system. Note that the "mdir" and "wdir" fields can be ""; their only purpose is to make it easier to build the command. The midifile is always in the DATA directory (that's where it will be written by the MIDI synth box) and the wave file must always be rendered in the Csound SSDIR.
In the previous example, MIDIsynth.bat is a simple batch file containing the two lines:
cd \audio\keykit\contrib\geomaestro\data
csound -dHWo %1 %2 %3 -TF %4
... this explain why the SSDIR is explicited in RegSynth()[3] (so that it is part of the %4 argument), while the DATA path is implicit (because of the cd in the batch file which takes care that we start in the DATA directory).
Note: if your synth is Csound-based, it is often useful to know by advance the duration of the MIDI file. GeoMaestro makes it available to Csound by writing a file named CS_INCLUDE_FILE in the INCDIR (by default, it is called "GeoMaestro.include.sco"). Including this file in your score defines the macro $duration which is the duration of the MIDI file.
To import a MIDI synth box, type "s n" at the prompt, where n is the synth number.
Typing "s ?" will display at the console a list of all registered synths.
Note: if you type "s -1", a dummy synth box will be created. It will erase the MIDI data from its children, like a black hole for MIDI only. This may be interesting when constructing echo boxes set-ups.
black hole (0):
The name says all: this box swallows all evaluation from its children, and always evaluates to plain silence. It is similar to a dummy synth box, but it also takes care of audio and Csound score.
The interest of such a box lies in the fact that you may want some boxes to be only heared from their echoes. See the RepWithEcho plug-in for an example.
Csound effect (x):
This type of boxes allows you to apply a Csound instrument (like a reverberator) onto a part of your composition when rendering to [Audio]. Customizing your own set of available effects is a procedure mostly intended for Csound users, as it is not straightforward. Using the provided set is rather simple, though. This kind of box is definitely not the most user-friendly we have here; it is an ackward way to have some basic kind of DSP happen within the Compositor.
Import such a box by typing "x " followed by the effect number or name, then by optional parameters (see below for the syntax). To have a list of the available effects, type "x ?"
For example, importing "x reverb" creates such a box:
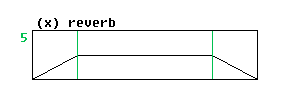
If you use the EditFields plug-in and select "reference", you will be able to edit the parameters of the box:
 ["d"]  192		# duration
 ["da"]  19.2		# default attack
 ["dec"]  -1		# decay (see below)
 ["dr"]  19.2		# default release
 ["nx"]  99		# effect index in RegGMFX()
 ["v1"]  0.5		# amplitude after attack
 ["v2"]  0.5		# amplitude before decay
Most of the time, you will only have to set the "v1" and "v2" fields. They define the amplitude of the effect from its beginning to its end, as the wet/dry ratio (from 0 to 1).
Set "nx" only if you want to change the type of effect. "da" and "dr" are only taken into account if you do not set the attack and release by the means of time stamps.
Note that you can directly give the value for these fields in the import command. For example:
x reverb v1=0.3 v2=0.8
creates this box:
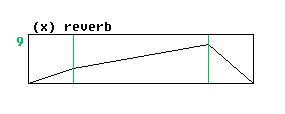
Here is an example of use:
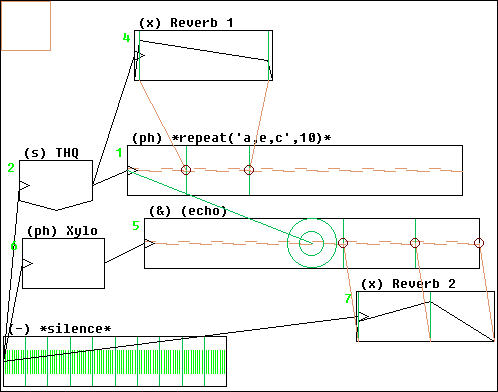
Effect boxes are specials in that the time of their action does not depend on the link, but only on the time stamps they receive. The link has only a logical function: it makes the effect happen. When it does happen is defined by time stamps which are represented in a specific manner: a small circle indicates the origin of the stamp. There are four marks in a (x) box: beginning (0), end (1), end of attack (2) and beginning of release (3). You may give a time stamp for all of them, (thus defining completely the effect envelope), or only for some of them: it must then be possible to define the envelope using the "da" and "dr" fields of the box; that is, you cannot only stamp marks 0 and 2, because there is no way to know when the effect is going to end. But you can stamp only marks 2 and 1: mark 0 will be mark 2 minus "da", and mark 3 will be mark 1 minus "dr". I hope this is clear enough.
How exactly does a (x) box work ? Its action takes place at the very end of the evaluation process, when rendering the composition to an audio file with Csound. If an effect has been detected in the composition, the rendering is done using a specific orchestra which is basically the usual mixer orchestra with hooks to allow effect instruments to be called from the score.
If you want to add a new instrument effect, you will have to hack the orchestra and the lib/gmfx.k file, where the instruments are registered.
Here is an excerpt of the code in lib/gmfx.k:
return([
	"orc" = "GMFX.orc",

	99 = ["x"= "reverb opcode",
	      "ishct"= "reverb",
	      "scoh"= [0= 1,
		       1= "i 99  $Start.   $Dur.   $p4."],
	      "p4"= "reverberation time (kvrt)", "defp4"= 1,
	      "dec"= "$p4."
              ],

        199 = ["x" = "Sean Costello's FDN reverb",
               "ishct"= "FDNreverb",
               "scoh"= [0= 2,
                        1= "; INS ST DUR GAIN RPM TONE",
                        2= "i 199 $Start. $Dur. $p4. $p5. $p6."],
               "p4"= "gain", "defp4"=.98,
               "p5"= "amount of random pitch modulation", "defp5"= .8,
               "p6"= "lowpass filters cutoff frequency", "defp6"= 20000,
               "dec"= 1  # ??
               ],

	# ...
The "orc" field gives the name of the Csound orchestra used for mixing with effects. The orchestra must live in the DATA directory.
What we have then is the code for registering two effects, number 99 and 199: these are the corresponding instrument numbers in GMFX.orc. The required fields are:
"x" is the full name of the effect (it will appear at the console)
"ishct" is the import shorcut: the keyword to use instead of the effect number when importing a (x) box.
"scoh" and "scot" are the score lines needed to invoke the effect. It may be necessary to declare f tables: do this is "scot". Only "scoh" is required: it is the i-statement calling the effect instrument. It must always start with i n $Start. $Dur.
where n is the instrument number. If you want to make parameters available for customization, use the $pi. syntax.
"pi" is the customizable parameter meaning, "defpi" its default value
"dec" is the default decay time of the effect: this is always added to the effect duration. This value is overidden by the "dec" reference field of the (x) box if it is different from -1. As you can see in the first example, the "dec" value can depend on the customizable parameters (the string will first be evaluated).
So the instrument 199 can be imported as a (x) box with the command
x FDNreverb
If we want to give it specific parameter values, this can be done by importing
x FDNreverb p4=0.8 p6=15000
To have the console display details about the customizable parameters and their meaning:
x FDNreverb ?
Registering a Csound instrument in RegGMFX() implies that the code for this instrument has been added to the corresponding orchestra (GMFX.orc by default). Take care of the following points:
Important: several (x) boxes are allowed in the composition, but their ranges should not overlap for this is not correctly handled by the GMFX orchestra (I guess in most cases it will simply sound bad).
If you want to have more than one effect at the same time, use (#) boxes to create intermediate *.wav files. This is detailed in the next chapter.
wave renderer (#):
This is a converter to audio. Its evaluation happens in two rounds: first it gets evaluated as if it was the starting point of the composition, then the resulting audio file is referenced, acting like a plain (f) box. The general idea is to have an audio file dynamically represent the children of the (#) box.
Usages are multiple. It is a dynamic replacement for the [}aud] button action, so it allows for using more than 16 instruments at the same time while still being able to work on each score.
It is also a way to provide an audio source for an echo box.
As stated in the previous chapter, you may use (#) boxes to have several Csound effects at the same time:
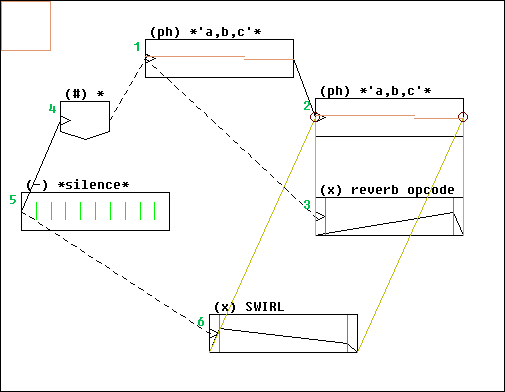
Here the reverb effect is first applied to the second phrase when the (#) box is evaluated (the starting point for the composition is box 5).
Then the SWIRL effect is applied to the resulting audio file.
The overall effect is a reverb filtered through a SWIRL. If the (#) box had not been there, the overall effect would have been a reverb mixed with a SWIRL, both fed with the same input signal (although with a different amplitude since this depends on the envelopes)
Obviously, using this type of boxes requires that all audio settings are correct.
echo boxes (&):
These boxes behave very differently from the other ones. To understand their principle, one must clearly see what happens when a box is evaluated: all its children (that is, all boxes belonging to a chain of links starting with the evaluated box) are in turn evaluated in a recursive process. The results of the evaluation is stored in the array RetourB: when you click on [Check], what you see is the field of RetourB (itself an array) corresponding to the current box.
For example, here are 3 phrase boxes, each of them having a single note as reference. They are chained together:
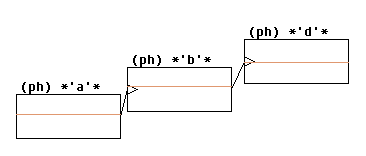
Let's say that their indexes are, from left to right: 1, 2 and 3
Evaluating box 1 will update RetourB[1], RetourB[2] and RetourB[3]. The evaluated phrases will be:
RetourB[1]["ph"] --> 'a,b,d'
RetourB[2]["ph"] --> 'bt96,d'
RetourB[3]["ph"] --> 'dt192'
..so that, as it has been described earlier, evaluating box 1 actually evaluates the whole composition. What is interesting to notice is that, in the process, each box of the composition has also been evaluated and embeds a part of the composition determined by its position in the tree structure.
For example, here is a set of boxes representing the same basic composition with another structure:
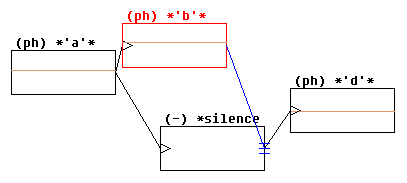
In this case, box 4 being the new silent one, the evaluation of box 1 would lead to:
RetourB[1]["ph"] --> 'a,b,d'
RetourB[2]["ph"] --> 'bt96'
RetourB[3]["ph"] --> 'dt192'
RetourB[4]["ph"] --> 'dt192'
... note the difference from the previous example in RetourB[2]["ph"]: the note 'd' is not there any more, because box 3 is not a child of box 2 anymore
Echo boxes are used to duplicate the results of the evaluation for any box, as their appear in the corresponding RetourB field, the only change being a starting time offset, so that the time position of the echoed (source) box in the composition is ignored (you can echo something before it happens...).
In our example, importing a box with the command "& 2" will create a box echoing box 2:
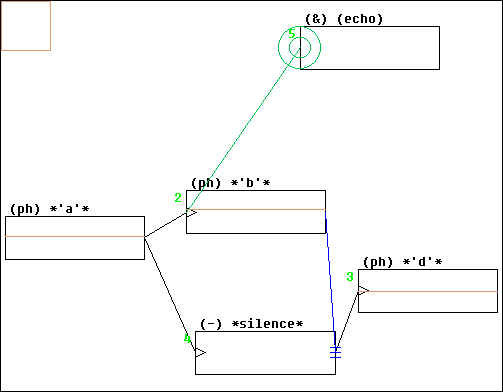
..evaluating box 5 will return 'b'
This can be used inside a composition to simply repeat a pattern, or to set up algorithmic structures: by default an echo is the simple copy of its source evaluated music, but it is possible to change its reference settings so that operations are performed on the source phrase and/or score.
In this example:
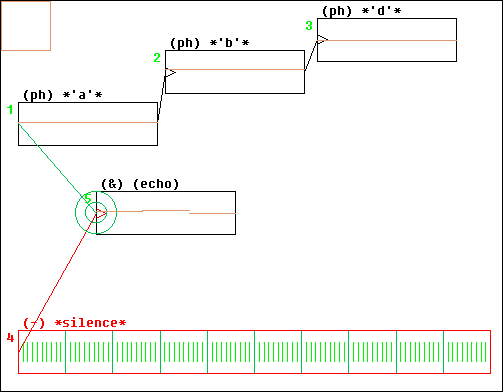
... evaluating the silent box returns 'a,b,d'
Now let's echo the echo itself: we create a box "& 5", link it to the silent frame and use the EditFields plug-in to change its ["ph"] reference from _ph_ to repeat(_ph_,5):
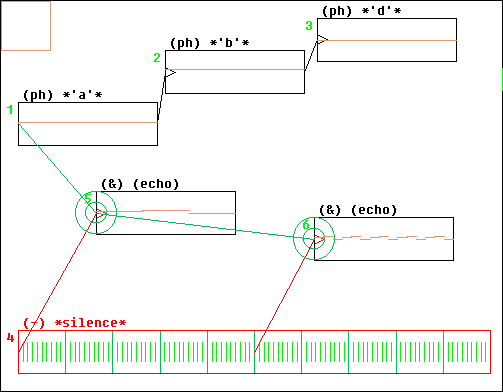
... this time, we will have the phrase 'a,b,d,at960,b,d,a,b,d,a,b,d,a,b,d,a,b,d'
Since it all relies on echoes, simply changing (with [REP]) the box 2 reference from 'b' to 'e' will lead to 'a,e,d,at960,e,d,a,e,d,a,e,d,a,e,d,a,e,d'
Note that you can give two source references when importing an echo box (command "& n m"). By default, their MIDI phrases will simply be mixed, but you can define any operation involving the two phrases by editing the "ref" field of the echo box with the EditFields plug-in: use the parameters _ph_ and _ph2_
Also, note that an echo box not only echoes the MIDI phrase of its source, but also its Csound score and audio files mix. You can not currently perform any advanced operation on audio mixes, though: if two sources are given, their audio references will simply be merged. Operations on Csound scores involve using high-level functions with the arguments _sco_ and _sco2_
An interesting aspect of this feature is that _ph_, _ph2_, _sco_, and _sco2_ can be used in both "ph" and "score" fields with EditFields. This means that you can map MIDI to Csound or the opposite, or more generally perform any mixed operation involving both sources.
Example: using EditFields ("reference") to have the following set-up:
["nb"]  1
["nb2"]  5
["ph"]  delay(_ph_,ScoreLengthClicks(_sco2_))
["score"]  _sco2_
... will define an echo box in which the score from box 5 will be played first, then followed immediately with the phrase from box 1
Mapping example:
["nb"]  1
["ph"]  ''
["score"]  MidiPhCS(_ph_, SomeMaps)
... here the phrase from box 1 is mapped into a Csound score
Using echo boxes can be tricky as it is not any longer required that all boxes in a composition belong to the same tree structure. As we have seen in the previous example, an isolated set of boxes can be echoed in the tree of the evaluated box children.
The trouble is that sometimes this simply don't work. This happens when different boxes from an isolated set are echoed at the same time. Here is an example:
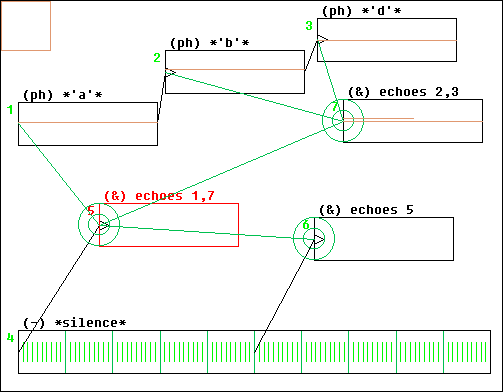
... this is a bit messy, so I changed the names of the (&) boxes so that we know who is echoing what.
In this example, evaluating the long silent box will not succeed. This is because all boxes from the upper set are echoed at the same time, so the Compositor is unable to come up with the right way to evaluate the upper set (which would be: evaluate only box 1). Instead, it triggers evaluation for each echoed box, leading to confusion in the returned data.
Maybe this is not to clear but never mind: the only thing to remember is that echoing several boxes from an isolated set is bad.
A simple way to avoid this kind of trap is to always have a single tree structure. To keep parts of it isolated, use a black hole or a dummy synth box by importing "s -1". In our example, this is done here:
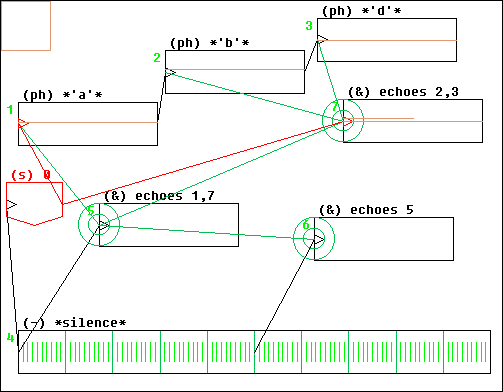
... now evaluating the silent box also evaluates the upper three boxes (since they are its children now), and also box 7, even though their data is not returned because it is dumped in a black hole by the nasty red box.
So all echoing works fine, because no extra evaluation is required.
One more thing: it is forbidden for a (&) box to echo one of its parents (this would define and endless loop). And, although it is not illogical, at the moment it is also forbidden for a (&) box to echo one of its children.
You can overcome these limitations by defining an iterative evaluation for your composition. See the chapter on iterative evaluation and (&&) boxes.
box file:
The *.box format is used when saving a box into a file (see [SAVE]). Since any part of a composition structure can be compacted into a single box (even the whole working area with isolated boxes, if you use the bottom [SAVE] button), this format allows you to save part or totality of your work.
To import a saved box, enter "b" at the prompt and choose the *.box file with the browser.
The values of the phrase and lignes variables used by the saved boxes are recovered from the *.box file; if their names conflict with existing variables, you will be asked if you want the latter to be overwritten.
Links and time stamps
Here is an example where are illustrated the four basic ways to set relationships between boxes:
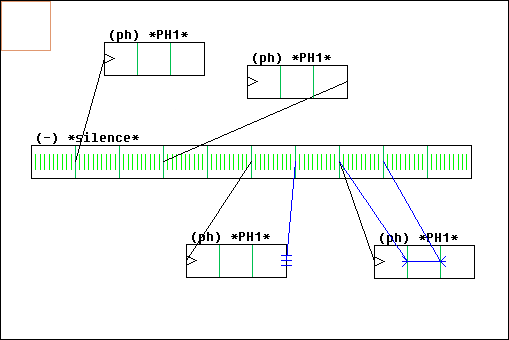
The 10-second long *silence* box is the one that will be evaluated. The four other ones are identical: they refer to a 3-note phrase with marks between each notes.
- first we have a simple link ("draw link" mode): at time 1 second, the phrase from the first box will be played
- second we have a link with offset ("draw link" and "link offset" modes): at time 3 seconds, the phrase from the second box will end. By separating the triangle part of the link from the rest, we define an offset in the starting time, which is calculated so that the target mark is synchronized with the origin of the link. The triangle can be located before or after the link.
- third we have a time stamp ("draw time stamp" mode): at time 5 seconds, the phrase from the third box will be played, its duration being adjusted so that it ends at time 6 seconds.
- finally, we have a "time scale" stamp (the grouping of two time stamps): at time 7 seconds, the phrase from the fourth box will be played, its duration being adjusted so that the two marks are actually 1 second apart.
Once the *silence* box is [EVAL]-uated, you can use the [SCA] button to scale all boxes with respect to the current one (*silence*, then). The display becomes:
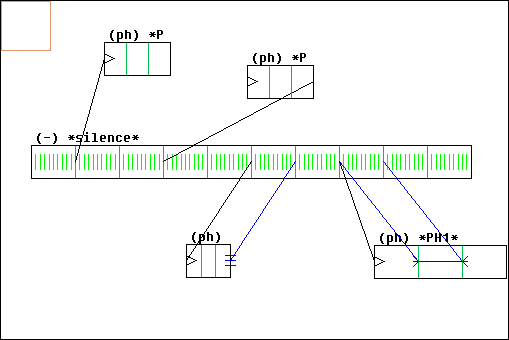
... where we can see the effect of the time stamps on durations.
Of course you can combine any kind of link with any kind of time stamp. The Compositor will not check weither the constraints you're defining make sense: it will be obvious when evaluating. If you asked for something impossible to calculate (the Compositor is not a very clever tool) or illogical, the evaluation will get stuck somewhere. After a defined waiting time (set by the parameter BOX_PATIENCE), it will stop completely and issue a "NOT OK" message. Then you can read the output of the process (in the console or in the GLogFile file) to see what happened.
By default, BOX_PATIENCE value is 5000, which means that the Compositor gives up the evaluating process after 50 seconds. With a large or complex composition (and/or a slow CPUs..), this limit will be reached even though there's no problem in the composition structure. You will then need to set BOX_PATIENCE to an higher value. Check the console output of the evaluation process to see how long the evaluation took; you will see if it's getting close to the allowed limit.
Customization:
Two main operations are performed on musical data when calculating the effect of links & stamps: delay and scaling.
On phrases, the functions used by the compositor to do so are KeyKit delay() and scaleng(). On scores, the functions used are DelayScore() and ScaleScore()
You may want to change these settings in order to introduce specific behaviours. For example, scaleng() scales a MIDI phrase by adjusting both the time and the duration of its notes: maybe you would prefer keeping the original durations (use scaphrase(), then, from GeoMaestro library). Or, more sophisticated, you may want that, when stretched, a phrase repeats part of itself, or plays as before at first and then slow down near its end, etc...
So you can specify which functions are to be used, by directly hacking the internal representation of the box you want to edit: use the EditFields plug-in (item ("delay/scale functions") and set the value of the following fields:
["fdph"]	# ... to delay a phrase
["fdsc"]	# 	(score)
["fscph"]	# ... to scale a phrase
["fscsc"]	# 	(score)
The value can be either a function name, in which case it is assumed that its parameters are the same as the default functions ones (phrase or score, then duration or delay time), or a full function call, in which case the phrase parameter must be replaced with _ph_, score with _sco_, duration with _d_ and delay time with _dt_
Here are a few valid examples (see the functions library to understand their behaviours, or just try them):
["fscph"]  scaphrase
["fscph"]  FloatingPh(_ph_, _d_, 0.3)
["fscph"]  RepeatFor
["fscsc"]  FloatingScore
For more permanent changes, affecting all boxes, set the values of the parameters CompoFDPH, CompoFDSC, CompoFSCPH and CompoFSCSC. They are defined in lib/initialisations.k
(and for yet another way to do so, from the console, check the functions SetDelayFunctions() and SetScaleFunctions() in lib/lib_compo.k)
Note: some links are represented as dotted lines. This means that the originating box somehow acts as a replacement for all its children (this is the case for (h), (s), (0) or (#) boxes; see the header boxes chapter for an overall discussion of this). It is a way to differentiate the usage of a link as a logical structure from its usage as a positionning tool.
Iterative evaluation and (&&) boxes
If you went through the previous boxes typology, you are aware that the echo (&) boxes are the main way to create algorithmic set-ups within the composition graph. After playing a while with (&) boxes, it is very tempting to make them reflect parts of the composition structure that eventually depend on their own evaluation, that is: to set-up loops in the composition.
When trying to evaluate the structure, the operation hangs and the Compositor may inform you that something get stuck somewhere. This is because there is no graph analysis implemented in the tool: it is unable to detect a loop, even less to deal with it.
You may still use such loops, but you have to inform the tool of what you intend to do; the evaluation will proceed without trouble only if you carefully set-up the structure.
The way to do so is to transform the relevant echo (&) boxes into iterative echo (&&) boxes. There is no functional difference between (&) and (&&) boxes: only the way they are evaluated changes.
From the beginning, the Compositor knows that a box having a (&&) in its children can not be evaluated in a single round of calculation (if this is not true, then you should have used a regular (&) boxe !). So it first gives all (&&) in the children arbitrary values: their seeds. Then it evaluates again the root box, so that its children(&&) boxes get their values normally, from their sources, which ultimately depend on their previous values, the seeds. Then the process is repeated a number of time stored in the variable IterativeEchoDepth.
How the eventual musical result does evolve depends a lot on the overall boxes structure and on the seeds values. For this reason you can either rely on a default behaviour according to which the seeds are plain silence, or give each (&&) box specific seeds, through the following reference fields (use the EditField plug-in to edit them):
"seedph" ("" defaults to IterativeEchoSeedPhrase)
"seedsco" ("" defaults to IterativeEchoSeedScore)
"seedaud"  ("" defaults to IterativeEchoSeedAudio)
Their values should be strings. They will be first evaluated as KeyKit expressions. By default (when first creating a (&&) box), they are all empty strings, which mean they point to the default values:
IterativeEchoSeedPhrase = ´´
IterativeEchoSeedScore = [0=0]
IterativeEchoSeedAudio = [1=[]]
You may override these settings to replace the default values. They are saved along with the Compositor when it is dumped, and restored with it.
Note that the musical length of the seed is the length of its phrase. This is 0 by default, which may be a problem since it does not allow for time stamps on the (&&) box (you will get a "division by zero" error if you try it). Change the "seedph" field to something like ´,l96´ or so to make it possible.
(à revoir, d´ailleurs ...)
Let's see a simple example. In the following composition, box 3 echoes box 1, and box 4 echoes boxes 1 and 3. Since box 1 is the root box, this clearly is a loopy set-up:
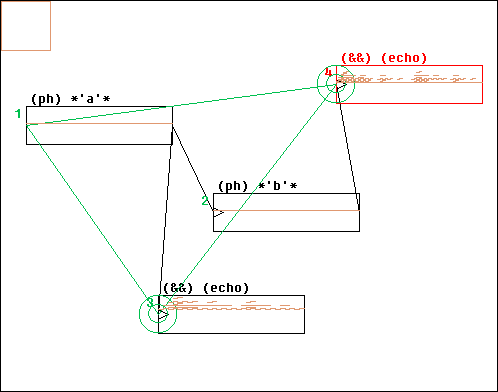
moreover, the "ph" reference field of box 3 is:
transpose(_ph_,12)
while the one in box 4 is:
(transpose(_ph_,-7))|(repeat(_ph2_,2))
All seeds are default ones: both (&&) boxes start as being silent, with duration 0.
Here is the resulting MIDI when [EVAL]-uating box 1, after IterativeEchoDepth = 5 iterations: iterexample.mid
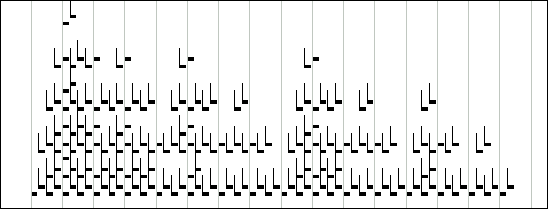
In this example, the resulting phrase gets more and more long and complex when IterativeEchoDepth increases.
Be careful when playing with (&&) boxes, as things get wild very fast. For example, the previous example with 8 iterations makes a phrase with more than 11000 notes.
Note that the current iteration level (from 1 to IterativeEchoDepth) is available in the global variable IterationN. You may use it within the composition: for example, a phrase box could be referenced to makenote(63,96,20*IterationN)
...in which case the note volume will increase through the iteraction process.
Another implicit use of IterationN is the "autofreeze" feature: when a box has its "autofroz" field set to any number, it will get frozen whenever IterationN reaches that value. This means that, for example, you can actually have different levels of iteration in your composition, by setting "autofroz" for the (&&) boxes themselves.
The main usage of "autofroz" is when it is set to 1: the corresponding box gets frozen after its first evaluation. This is a very convenient way to avoid unnecessary calculations, since not all parts of the composition do change from an iteration to the next.
Use the EditFields plug-in to set "autofroz"
Time line mode
Normally, the length and position of a box are not related to its actual starting time nor musical length (duration).
Now clicking [SCA] does set the lengths of all evaluated boxes so that they reflect their durations, making them proportional to the current box, whose length is unchanged. Non-evaluated boxes and boxes of duration 0 (such as synth boxes) are not touched. The scaled boxes are displayed slightly differently fom the others: small diagonal segments rise from their corners,like this:
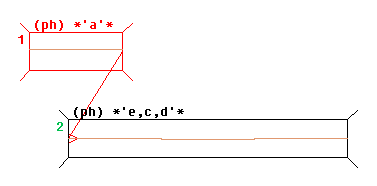
To have the positions of the boxes reflect their starting time, set the parameter ScaleToTimeLine to 1. The next time you will click [SCA], the evaluated boxes will be horizontally moved in order to set up a classic time-line representation. Also, a grid will appear in the background, marking regular steps (from 1 click to 1 minute wide, depending on the zoom) from the current box. Note that the current box does not have to start at t=0 !
If you want to specify a particular box as being the origin of the grid, whatever is the current box, then set its name to the value of parameter TLOKeyName.
If you don´t want the grid display, set the parameter DisplayTimeLineGrid to 0
Clicking under the "Infos" mouse mode anywhere now prompts the time at this point, in two formats: absolute, and relative to the current box starting time.
You can tell a box is at its right place when it looks like these ones:
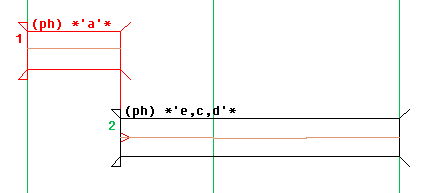
In the previous picture, the two small triangles at the left of each boxe are actually there because both length and position fit the time-line. If we change the length of box 2 ("grab box" mouse mode), this leaves only the sign that it is located at the right place:
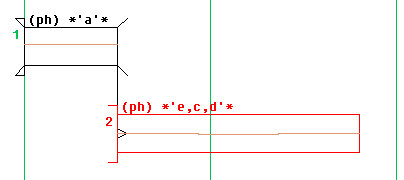
Remember that the so-called time line "mode" is basically a display feature; moreover, it is not automatically updated: you have to click [SCA] in order to refresh the view, and nothing prevents you from moving or scaling boxes. Also, remember that it only works on evaluated boxes, since it needs time values.
The TLOffset plug-in allows you to move boxes with the mouse and have the horizontal offset taken into account according to the underlying time line. It does so by creating intermediary silent boxes.
The boxes menu and its associated buttons
The boxes menu is available from the large button at the right of the [>] one. It is there that you can select what I call the current box; all operations performed by the following buttons only apply to the current box. Don't confuse it with the red box in the graphic area: this is a selected box, somehow, but it is distinct from the current one. By the way, the [>] button makes the red box (if any) become the current box.
Each box has a number, but don't rely on it ! Some operations change this number, so it can not be taken as an identifier. Better rename the box to remember what it is.
[EVAL] performs the evaluation of the box (and of its children). Look at the text in the console: if it ends with "OK"... it's okay! The resulting MIDI phrase is Snarfed. The time range can be restricted using limits (which is very useful to quickly check the effects of changes in a specific part of the composition). You can stop the evaluation process at any time by hitting SPACE.
The four buttons just below [EVAL] are used to manage the different results of the evaluation:
Also:
- [O] (also activated by the bang() method of the tool) sends the evaluated phrase to the Midi Out port.
- [F] lets you export it as a MIDI file.
Note: as an exception to the rule saying that all buttons only apply to the current box, it is possible to have all the previous evaluation-related buttons be linked to a definite box (the starting point for the whole composition), regardless of the current box. To do so, simply give to this box the name stored in the global variable EvalKeyName (This variable is dumped and restored with the tool; by default it is "GO!"). The starting box will be displayed with three inner blue circles.
[?] gives infos about the current box
[REN] allows you to rename the box, or to name it in the first place, since when you import a box it is automatically given a temporary name (between *)
[SCA] sets the length of all evaluated boxes so that they are scaled according to their (musical) length with respect to the current box (which must itself have been evaluated). If the parameter ScaleToTimeLine is set to 1, the boxes will also be moved horizontally so that the overall display will be similar to an usual time-line representation. More about this here.
[REF] refreshes the box. All (auto)matic marks are updated: replaced or moved. All user marks behave accordingly to their comment option (see here for more). The marks currently in use are always kept (not necessarily at the same place), even if they would normally disappear, so that no link or time stamp is broken. On (T) boxes, [REF] has a different action: it swaps the display in the graphic area so that you get access to the tool. Click [REF] again to swap back to the boxes network display.
[||] lets you manually edit the marks of the box (see here for details). This button behaves in two steps: first it lets you edit a file; then, at the next click on it, it asks if you want the changes to be taken into account. If you don't, just press RETURN and the button will again display an editable file. If you say yes, it won't (are you saying I'm not being clear here ?)
[{] and [}] respectively expands or compacts the current box. When you compact a box, all its children are swallowed in it, keeping their internal structure of links, stamps and echoes. This makes it easy to copy/paste or save whole parts of the composition, or simply to hide them from view temporarily. Beware that the stamps and echoes existing between the children of the box and "external" boxes will be broken by the compacting operation. A compacted box is labelled "(@)". If you compact the root box of a composition (the one who is parent of all the other boxes), then saving it saves the whole composition (it will not save the isolated boxes you may have in your work area, though; to do so, use the bottom [SAVE] button). The [{{] button (at the bottom of the tool) expands in one pass all compacted boxes present in the composition.
[REP] replaces the box: that is, changes its reference or type (exactly like if you were importing a new box) but keeps its position and used marks.
[ph] translates to phrase: if the current box type is (ph), (£) or (T), this button will hard-code its current phrase value and transform the box into a plain (ph), so that it is not subject to change anymore. This is a way to "freeze" a parametrical value (for example, if the box is a (ph) with reference "makenote(N)", its value will depend on N, but when you freeze it with [ph], it will keep forever the value corresponding to the current N... same thing with lignes)
[#] will graphically outline the current box, so that you can easily see which one it is. To remove the outline, click on [REDRAW]
[SAVE] saves the box in a *.box file. You can read these files with the "import box" mode, by typing "b" at the prompt. There is another [SAVE] button at the bottom of the tool: use it to save the whole work area, complete with isolated boxes (this will also use the *.box format)
[} ph] this translate the box and all its children to a phrase, like the [ph] button does for a single box. It does this by first compacting the box, so take care of the links and stamps that could be broken in the process.
[}aud] this translate the box and all its children to an audio file. It will only work if all the required audio settings are correctly defined (see here for details). This is a very useful way to create compositions were keeping MIDI all along would fail because too many different patches are used at the same time: by converting some parts of the composition to audio, there's no limit to the number of different patches you can use at the same time. The obvious drawback being that you can not make any more changes inside an audio file ! For a more elaborate way to do this kind of thing, see the (#) boxes chapter.
Other buttons
tag buttons
tags are letters used to define subsets of boxes; you can have 52 differents subsets defined at once (a to z and A to Z). The tags associated to a box appear at the bottom of the box, provided that it is long enough for the display to be possible.
See the functions coded in lib/lib_compo.k for examples of tags usage: they allow you to perform arbitrary operations on specific subsets of the box structure.
For example, the console command
SetAmplification("a", 1.5)
... will set the amplification level of all boxes tagged "a" to 1.5
The tag menu button (labeled "tag:") lets you select the current tag. When in "(un)tag box" mode, clicking in a box toggles it in/out the tag subset.
Just below, [>$] and [$>] convert the tag subset to the $ selection, and back. If a $ selection already existed, the tag subset is added to it, so usually doing [>$] then [$>] does change the tag subset; better use [UNDO] to step back if you need to.
The [tc] button toggles the tag on/off for the current box
The three other small buttons are used to mute boxes:
[m] is the mute toggle for all boxes in the tag subset
[cm] does the same for all boxes in the tag subset plus their children
[A] set all boxes in the composition to "Audio" (no mute box)
Muting a header box or a MIDI synth one kind of "liberate" their children: the MIDI notes or score lines their contain are not dumped any more.
For example, you can form a chain of linked MIDI synth boxes and mute them all but one: this way you can easily test different synths on a same part of the composition:
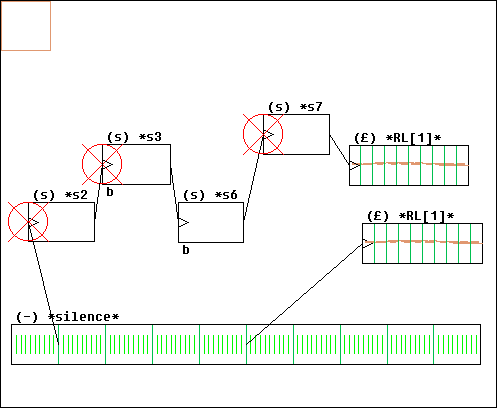
... here the upper RL[1] phrase is rendered by synth number 6, the second RL[1] phrase being rendered by the default TiMidity setting...
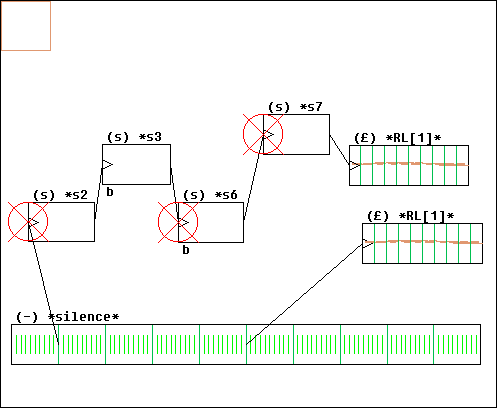
... while here the upper RL[1] is rendered by synth number 3.
You can toggle between these two configurations by clicking on the [m] button, provided that the current tag is "b"
The [OP]eration button
Similar to the main GUI [operation] button, this allows a command to be iterated over the whole set of boxes. Its usage assumes some understanding of the way the boxes are internally represented (this is not a very well documented topic, though).
The variable B_ contains the boxes array, while N_ takes in turn all values in B_, so that B_[N_] iterates over all boxes.
Since the internal representation of boxes is fairly complex, a set of shortcuts are provided:
type°  stands for  B_[N_]["type"]
tags°  stands for  B_[N_]["tags"]
mute°  stands for  B_[N_]["mute"]
mxl°  stands for  B_[N_]["mxl"]
ref°  stands for  B_[N_]["ref"]
nom°  stands for  B_[N_]["nom"]
refph°  stands for  B_[N_]["ref"]["ph"]
x°  stands for  B_[N_]["x"]
y°  stands for  B_[N_]["y"]
l°  stands for  B_[N_]["l"]
t0°  stands for  B_[N_]["mt"][0]
t1°  stands for  B_[N_]["mt"][1]
b°  stands for  B_[N_]
So for example:
x° += 10
moves all boxes to the right by an amount of 10 local units.
More useful,
print(N_,t0°,t1°)
prints at the console the starting and ending time for each box.
This can also be written:
: N_,t0°,t1°
(: is a short-cut for print(...))
or:
? N_,t0°,t1°
(? is also a short-cut for print(...), which does not store any [UNDO] data, thus suitable for simple queries)
Another useful shortcut is t: which restrict the operation to tagged boxes:
t:a x° += 10
is the same as
if (tags°~~"a"){ x° += 10 }
You can define your own scripts and associated shortcuts by adding to the function CompositorOperations(), defined in userlib/GUIuserreg.k
Other buttons
[NEW] deletes all and starts a new composition from scratch. You can [UNDO] that.
[OUT] shows the internal representation of the set of boxes; useful to debug the tool, not intended for the end-user
[custom] lists at the console the main tool parameters and their values
Managing marks
In the box types section we have seen how some marks are automatically created when a box is first imported in the composition (see also here for an overview). The mark system is actually much more flexible, if you take care to manually edit the set of marks associated to a given box, with the [||] button. It is a bit complex, but this is the price to pay for full customization.
(Note that alternate ways to create marks are provided by some plug-ins)
Here is an example of an editable marks table, from an isolated evaluated box:

POSITION CLICKS   SECONDS  | a-clck   a-sec    num usage | COMMENT
0        0        0        | 0        0        0   .     | ""
0.025    19.2     0.1      | 19.2     0.1      4   .     | "c7 |a"
0.125    96       0.5      | 96       0.5      2   .     | "c6 |c <m> (@)"
0.625    480      2.5      | 480      2.5      3   .     | "c6 |c <m> (@)"
0.975    748.8    3.9      | 748.8    3.9      5   .     | "c7 |1"
1        768      4        | 768      4        1   .     | ""
                           | --------------------------- |
                           | --------------------------- |
                           | --------------------------- |
                           | --------------------------- |
                           | --------------------------- |
                           | --------------------------- |
                           | --------------------------- |
                           | --------------------------- |
                           | --------------------------- |
                           | --------------------------- |
The first three columns represent in different ways the position of the marks: POSITION is the relative representation, between 0 (beginning of the box) to 1 (end of the box). CLICKS, only available if the box has been evaluated, is the position in clicks with respect to the beginning of the box, and the third column shows the same position in seconds. When you edit this section of the table, remember that POSITION has precedence over CLICKS which itself has precedence over SECONDS; to cancel a column, replace the number that was there by a "-" (see below for an example)
The middle section shows the time values of the marks within the composition (the example I choosed here is a single box, so they are the same as the CLICKS and SECONDS columns); it also shows the marks indexes (not an interesting information, usually, only here for debugging purpose) and the current use of each mark: a point if it is not used, a "d" if its the starting point of a link ("t" for time stamp), a "c" if it's a link target ("s" for time stamp, or "x" if for a (x) box), or any combination of those. This middle section is not editable.
The last section, COMMENT, sets the behaviour of a mark when the box is refreshed (using the [REF] button), along with the aspect of the mark and its associated comments. The codes used are described below.
Now, here is an example of manual modifications of this table:
POSITION CLICKS   SECONDS  | a-clck   a-sec    num usage | COMMENT
0        0        0        | 0        0        0   .     | ""
0.05     19.2     0.1      | 19.2     0.1      4   .     | "c7 |a"
                           | 96       0.5      2   .     | "c6 |c <m> (@)"
  -      600      2.5      | 480      2.5      3   .     | "c6 |c <m> (@)"
  -       -       3.8      | 748.8    3.9      5   .     | "c7 |1"
1        768      4        | 768      4        1   .     | ""
0.5                        | --------------------------- |
  -       -       1        | --------------------------- | "c6 |a"
                           | --------------------------- |
                           | --------------------------- |
                           | --------------------------- |
                           | --------------------------- |
                           | --------------------------- |
                           | --------------------------- |
                           | --------------------------- |
                           | --------------------------- |
- in the second line of the table, all three first numbers have been deleted: this means we want to delete mark number 2
- in the first line, we change the relative position of mark number 4 to 0.05.
- in the fourth line, we set the position of mark number 3 to 600 clicks from the beginning of the box
- in the fifth line, we set the position of mark number 5 to 3.8 seconds after the beginning of the box
- in the seventh line, we declare a new mark at relative position 0.5
- in the last edited line, we declare a new mark at 1 second after the beginning of the box. Also, we set its appearance to a long green segment ("
c6") and set its behaviour to "absolute position" ("|a")
Let's see this last topic in details:
1) The two fisrt characters of the comment string can be used to set the appearance of the mark:
- "
c6", "c2" or "c5" for a long green, red or blue segment
- "
c7" for a short lighter green segment
- "
00" for an hidden mark
- default is a long black segment
2) Two characters forming a "|x" pattern can be used to set the behaviour of the mark when the box is refreshed:
- "
|p", or nothing (default) indicates a proportionnal mark: if the box get longer or shorter, the mark will follow to keep its relative position (remember that "long" and "short" do not refer to the appearance of the box, but to the actual length of the musical data it refers to)
- "
|c" means that the mark is slave of its comment string: if the same comment appears somewhere else, the mark follows. This is used for example when refreshing lignes: the automatically generated marks appears accordingly to the "inter" field of the ligne, and their comment strings describe their logical position. So as long as the ligne keeps the same "inter" structure, the marks stick to that structure; see here for a more comprehensive explanation.
- "
|a" indicates an absolute definition of the mark: its position with respect to the beginning of the box will not change. Simply, if the box gets shorter than this position, the mark will be set to 1.
- "
|1" is again an absolute positioning, this time with respect to the end of the box. If the box gets too short, the mark will be set to 0.
3) A "(@)" or "(auto)" at the end of the comment signals that it has been automatically generated. Such a mark will not be kept when [REF]reshing the box, unless it is actually used.
When clicking again on [||] and typing "y" or "yes", the marks get updated and the box now looks like this:

... with the following table (after another [||]), including our modifications:
POSITION CLICKS   SECONDS  | a-clck   a-sec    num usage | COMMENT
0        0        0        | 0        0        0   .     | ""
0.05     38.4     0.2      | 38.4     0.2      3   .     | "c7 |a"
0.25     192      1        | 192      1        6   .     | "c6 |a"
0.5      384      2        | 384      2        5   .     | ""
0.78125  600      3.125    | 600      3.125    2   .     | "c6 |c  (auto)"
0.95     729.6    3.8      | 729.6    3.8      4   .     | "c7 |1"
1        768      4        | 768      4        1   .     | ""
                           | --------------------------- |
                           | --------------------------- |
                           | --------------------------- |
                           | --------------------------- |
                           | --------------------------- |
                           | --------------------------- |
                           | --------------------------- |
                           | --------------------------- |
                           | --------------------------- |
                           | --------------------------- |
Overview of the different mark creation modes:
Marks are created:
Tool parameters
The following parameters are defined in the lib/initialisations.k file. If you define permanent personal settings, do so in the GeoPostInit() function, as it will make it easier to update the system without loosing your settings.
Most of these parameters are registered in the customization tool.
Parameter
|
Usage
|
Default
|
COMPOUNDOLEVEL |
size of the UNDO stack |
30 |
BOX_PATIENCE |
amount of time (in 1/100 sec.) the Compositor is ready to wait before deciding something went wrong in the evaluation process. |
50000 |
ShowPhraseInBox |
when set to 1, the MIDI notes in an evaluated (ph), (&) or (£) box are displayed àla Group Tool. With the default display (if PhraseDisplayInBox is ""), setting it to a higher value gives the ratio between ignored notes and displayed ones (if 10, only 1 note out of 10 is displayed). If it is 0, nothing is displayed. |
1 |
PhraseDisplayInBox |
this is the actual default function called to display phrases in boxes (it is overidden by the "phdisplay" field of a given box). PhraseDisplayInBox should only be its name (a string). Parameters are: $, phrase, box geometry (xyarray), box duration. When PhraseDisplayInBox is "", we get the default drawing procedure described above |
"" |
ShowScoreInBox |
when set to 1, the score in an evaluated (C), (&) or (£) box is displayed according to the function referenced by ScoreDisplayInBox. If it is 0, scores are not displayed. |
1 |
ScoreDisplayInBox |
the actual default function called to display scores in boxes (it is overidden by the "scodisplay" field of a given box). Similar to PhraseDisplayInBox. Parameters are: $, score, box geometry (xyarray), box duration. When ScoreDisplayInBox is "", scores are not displayed (there is no internal drawing procedure in the tool) |
"StdScoreDisplay" |
DisplayBoxIndex |
when set to 1, the upper left of each box features its index (a number). |
1 |
SILENCEMARKS |
maximum duration of a silent box in order to have marks automatically created (in seconds) |
30 |
LIGNEDEPTH |
maximum depth of analysis for automatic creation of marks from the "inter" field of a ligne. |
2 |
ScaleToTimeLine |
when 1, the [SCA] button not only scales the boxes length, but also moves them to display the composition in a classic time-line fashion. |
0 |
DisplayTimeLineGrid |
when 1, a background grid is displayed in time line mode. |
1 |
COMPOMAXAMP |
upper limit of the amplification parameter (1 means 100%) |
2 |
NoAudioFromCompositor |
set this to 1 if you have not installed TiMidity++ and/or Csound the way it's described here. |
0 |
EditAudioMixWave |
when 1, the audio editor (called by WAVEEDITpath) opens the rendered *.wav file for each [Audio] rendering. |
? |
ToolsToGMCompo |
is an array containing default settings for importing KeyKit tools in (T) boxes. |
- |
CsoundOrchestra |
is a string containing the file name of the Csound orc to be used with the main score in the composition; if different from "", this overrides the content of Ev["orc"]. |
"" |
EvalKeyName |
a box having such a name will be the target of the evaluation-related buttons (otherwise it is the current box) |
"GO!" |
TLOKeyName |
a box having such a name will be the origin of the time-line display (otherwise it is the box current when [SCA]-ling) |
"GO!" |
CompoFDPH |
Default function for delaying phrases. This is overidden by the "fdph" field of a given box. |
"delay" |
CompoFDSC |
Default function for delaying Csound scores. This is overidden by the "fdsc" field of a given box. |
"DelayScore" |
CompoFSCPH |
Default function for scaling phrases. This is overidden by the "fscph" field of a given box. |
"scaleng" |
CompoFSCSC |
Default function for scaling Csound scores. This is overidden by the "fscsc" field of a given box. |
"ScaleScore" |
CompoScoAmp |
Default function for amplifying Csound scores. The default "Id" simply returns the score (no amplification). This is overidden by the "scoamp" field of a given box. |
"Id" |
CompositorLog |
if 1, all info printed at the console when evaluating a box is also written in the file CLogFile |
1 |
Audio rendering
While you can use the compositor tool to compose a MIDI file which will be used in any possible way, you can also directly output audio files. The audio processing has to be done by external programs (a synthetizer and a mixer), since KeyKit is only concerned with MIDI data (out of curiosity, you may want to have a look at tutorial 11 which describes a way to directly generate audio data with KeyKit/GeoMaestro... it is very, very slow...).
The configuration I'm going to describe here uses TiMidity++ and Csound, which are very good softs, freely available and always in progress. Changing this configuration implies quite a bit of hacking, so this topic is not covered here (note that you can have MIDI parts be rendered with another synthetizer using MIDI synth boxes, and that you can also use the log file MIX_LOG to perform the mix with any mixer program, so these are not real limitations anyway)
Also, this configuration is intended for Windows and Linux. It should not be difficult to adapt it to other systems, but since I didn't try it, I won't give any advice here. All the parameters that have to be changed are described here, and can be set in the initialisations.k file (or in your GeoPostInit() function, which is better)
The only suppported audio format is 44100 Hz / 16 bits RIFF WAVE; there's no much interest in having a larger choice of formats (besides the fact that it implies a lot of boring programming) since you will anyway need an audio editor if you want to do some serious work with sound files. So use the editor to convert files from one format to another... (for an Open Source editor, check WaveSurfer)
Here's the idea:
The immediate output of the compositor, when evaluating a box, is of one or several of the following types:
- a KeyKit phrase
- a Csound score
- a set of instructions for mixing audio files
Let's suppose that our composition produces all of this things, together constituting one single piece of music; after evaluation, we will still have to:
- generate sounds from the MIDI phrase (with a softh synth, for example)
- generate sounds from the Csound score (with Csound, obviously)
- mix all sounds (with a mixer)
It is possible to have GeoMaestro automatically manage these steps, if TiMidity++ is the soft synth used for rendering audio from MIDI. All we need are the correct environmental settings so that GeoMaestro knows how to call the other programs and which files are to be used in which directories. All of this is rather tedious but you only have to do it once.
Csound will be used as mixer. I recommend that you get the console versions of TiMidity++ and Csound; the first one because it provides a cspline (whatever it means) interpolation giving better audio rendering, the second one because it is faster than its GUI counterpart (also, I couldn't figure out how to use a command line for Winsound...)
The audio files used in the composition must obey the following constraints:
- they must be located in Csound SSDIR
- they must be 44100 Hz, *.wav RIFF WAVE (mono or stereo)
- their names must be DOS compatible (8 character-long, etc...) otherwise the Csound console version won't recognize them
Also, the Csound score/orchestra pairs used in the composition must be located in the DATA directory .
What follows is a precise description of the overall process; the involved parameters (defined in lib/initialisations.k) have the following default values (completely useless to you, just take this as an example):
#----------------------------------------------------
SSDIR = "C:\\CSound\\Samples\\"		#  Csound's SSDIR
SFDIR = "C:\\CSound\\Rendered\\"	#  Csound's SFDIR

MIX_LOG = DATA+"LOGMIX.TXT"			# log file

AUDIOMIXrootname = "tempmix"			# .orc et .sco will be in DATA, .wav in SSDIR
AUDIOMIXsconame = "scomix"			# .wav in SSDIR (for main score rendering)
AUDIOMIXtempmidi = MDOP+"compoMIDI.mid"		# temporary MIDI file (full path)
TIMIDITYmixflags = " -int -A80 -s44100 -Ow -o "	# TiMidity++ options used in the mix
AUDIOMIXrendered = "mix.wav"			# always in SFDIR

CSOUNDCOMMANDLINE = "geomix.bat "	# a batch file for Csound operation

CsoundOrchestra = ""		# file (in DATA) to be used with the main Csound score
				# if "", the orchestra defined in Ev["orc"] will be used

FastMix = 1	# skipping useless calculations
#----------------------------------------------------
Let's go for the details:
Evaluating the box number nb (with [EVAL]) updates the global array RetourB[nb] (the other fields of RetourB contain the evaluation results for all boxes children of nb and are simply temporary results, we don't bother about them here).
The BoxToWave() function does all the audio processing job: it is called by the [Audio] button. Its code is in lib/compositor.k
BoxToWave(nb)
... reads RetourB[nb] and create a corresponding audio file called AUDIOMIXrendered (always located in Csound's SFDIR directory)
Now the details, again:
1) First it writes RetourB[nb]["ph"] in a temporary MIDI file called AUDIOMIXtempmidi
2) Then is calls TiMidity++, using the command
system(TIMIDITYpathF+TIMIDITYmixflags+SSDIR+AUDIOMIXrootname+".wav"+" "+AUDIOMIXtempmidi)
... this creates an audio file called AUDIOMIXtempwave in Csound SSDIR directory
Steps 1) and 2) are skipped if FastMix is set to 1 (which is the default), and if the current value of AUDIOMIXtempmidi is the same as the one that would be created. In this case the current AUDIOMIXtempwave is used. This way, when you do [Audio] several times in a row, no useless calculation is done if the MIDI part of the composition has not been changed meanwhile
.
3) Then it looks for Csound score filenames in RetourB[nb]["audio"]: when a score appears here, it comes from a score header box, and its associated orchestra should be indicated as a comment in the first line of the code. So GeoMaestro can straight away call Csound and render the score in a temporary .wav file in SSDIR with the command
system(CSOUNDCOMMANDLINE+ ...names of orc, sco and wav...)
In the same way, it also looks for MIDI parts that are supposed to be processed independently, and use the corresponding registered synthetizers to render them as temporary .wav files in SSDIR. See the MIDI synth boxes section for details.
Again, step 3) is skipped if FastMix is 1 and if the score/MIDI part did not change since the last time it was calculated. If you're writing or debugging the associated orchestra(s), you should then set FastMix to 0 otherwise the changes will not be taken into account.
4) Then it processes the main score, that is: the part of the score left (which has not been dump by a score header box). It uses the orchestra referenced in CsoundOrchestra if it is defined; else it looks in Ev["orc"] (this should be a filename with no path, since it's supposed to live in the DATA directory) to render it as yet another temporary *wav file, whose name is SSDIR+AUDIOMIXsconame+".wav"
5) Then it goes through the rest of the mix description contained in RetourB[nb]["audio"] and translate it into a Csound score and orchestra set, using the filenames AUDIOMIXrootname+".orc" and AUDIOMIXrootname+".sco". The orchestra relies on Csound's diskin opcode, which allows audio signal from a file to be stretched or extended, so we can use time stamps on audio boxes.
At this point it also writes a log file whose named is defined in MIX_LOG. In this file you will find a list of all the temporary files created by the process (*.mid and *.wav), followed by the information necessary to perform the mix: since the mixing scorc is quite rudimentary, you may want to do the mix by yourself using a specific program. In that case set IgnoreMix to 1 and use the MIX_LOG file for indications. A good way to work would be to use the automatic mix feature while composing the piece then, eventually, when everything is in place, use the log file to perform the final mix manually so that you can fine-tune it.
6) Finally, if IgnoreMix is set to 0, it calls Csound using
system(AUDIOMIXCOMMAND)
... here Csound works on the previously defined score and orchestra and output an audio file called AUDIOMIXrendered.
You must absolutely define CSOUNDCOMMANDLINE so that it calls Csound from within the DATA directory
In my case, it is "geomix.bat ", which is a batch file (C:/Csound/bin/geomix.bat) containing the following instructions:
cd \audio\keykit\contrib\geomaestro\data
csound -d -H -W -o %3 %1 %2
... the first line sets the current directory to DATA, the second one calls Csound on the three parameters given to CSOUNDCOMMANDLINE: orchestra file name, score file name and wave file name, in this order.
The two other parameters you definitely need to set are SSDIR and SFDIR, so that they fit the corresponding Csound directories.
AUDIOMIXCOMMAND is automatically created out of the other variables. So only what was listed above needs to be customized.
I know this seems like it's a big mess, but once everything is tuned (see also here for TiMidity settings), you will have audio from your composition simply by clicking the [Audio] button.
At times, you may want to ignore whole parts of your composition, so use the following flags to do so (you can change their values at the console):
IgnoreSco 		# when set to 1, Csound scores are not rendered
IgnoreWav 		# same with sound files
IgnoreMIDI 		# same with the main MIDI phrase
IgnoreSynth		# same with MIDI parts dumped for alternate synths
IgnoreMix 		# if 1, the final mix is not performed
.. of course you can also mute boxes to silent parts of your composition.
... and if all of this really sounds horrible and confusing to you, you can just completely desactivate the audio buttons by setting
NoAudioFromCompositor = 1
-- Back --


