GeoMaestro
Tutorial 1: basics
This tutorial provides a very basic example of a GeoMaestro's graphic tool (GUI) usage. You should have had a glance at the GUI documentation before going on (most of the links in this page will get you back there for details on specific topics).
(In the following, the [brackets] syntax always refers to buttons).
We will suppose you have started the graphic tool (KeyKit root menu Tools1 -> Geo Main GUI or Tools1 -> --Geo GUIs--) and have a console window available. Click on [new] to initialise the event scene, and on [grid] twice to have axes and loose grid on.
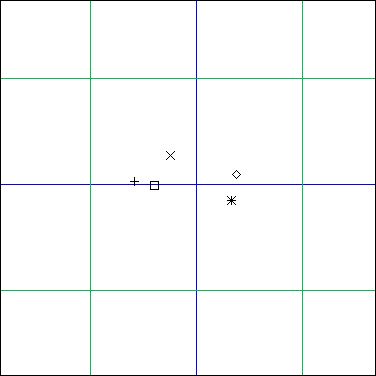
Using the mouse mode "new event", click in the scene somewhere in the green square around the origin, and enter 'a'#1 in the pop-up window. Repeat this with 'b'#2 , then 'c'#3 , then 'd'#4 and finally 'e'#5
You should have something like that in your window now (use [zoom in] and [zoom out] to adjust the view):
Choose the instruments you want to associate to each channel (the events we created belong to channels 1 to 5): click on [fn], then for each channel you select in the [ch ..] button, you can choose an instrument from the upper menubutton and realise the association by clicking [->] besides. The console issues a message confirming the settings.
Now we're going to generate a projection using the Helice() projector. To define the rotation center point, we can either use the console and type Or = xyd(0,0) or use the "new point" mouse mode. If you do so, click around the center and enter Or as the name of the defined point. If you wanted this point to be exactly the center (x=0, y=0) you would have clicked on the [snap]" button before... but it's not to late ! you can select it (it should now be a blue circle, selecting it makes it a red double circle), click on [operation] and type X_=0 ; Y_=0
If you defined Or at the console, you won't see it in the GUI. To see it, click on [display] and type Or. That's it !
(I have to say that all this was unnecessary because the origin point Or is automatically defined during GeoMaestro's initialisation... but this is a tutorial, isn't it ?)
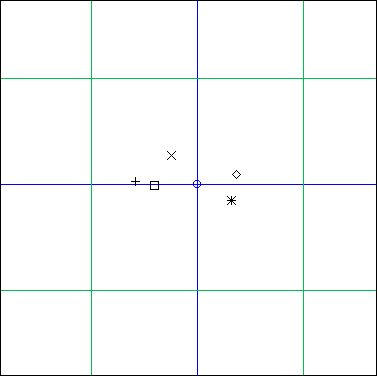
Now you should have this:
Now, click on the small [pj] button to set the GUI in projection mode. The button labelled "PROJECTORS" is a menu: select the item "Helice", then click in the [--->] button just beside.
A pop-up window appears with the prompt: "Args >", and at the same time in the console you have a message describing which arguments the projector is waiting for. So enter Or, 1, 0, 0.2*Pi, 1 at the promp.
What happens now is that the tool is calculating the projection Helice(Or, 1, 0, 0.2*Pi, 1) and storing the resulting line in the second menu button, just below the projectors one.
You should see "1: Helice(Or, 1,..." on this button.
To hear the result, click on [hear] (of course you must have some sound device connected to your MIDI out port).
To see the segments used by Helice for the projections, click on [display] and type Ł1 (On U.S. keyboards, the Ł character is available through Alt+0163; you can also replace Ł1 with RL[1], as Ł is simply a shortcut to access the RL array).
You should have this in your GUI:
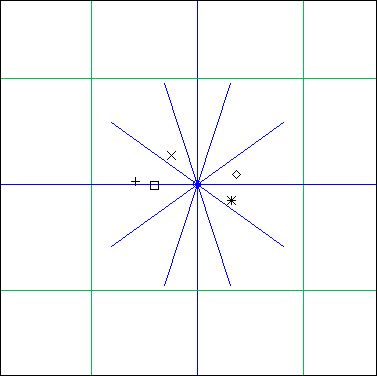
The new blue lines we have are the segments Helice() used as parameters for Ecoute(). The five events have been projected in the first one (the horizontal one), so a MIDI phrase of length 2*CPCM (that is 2 seconds, if you didn't change CPCM) has been rendered, then on the second one, giving a new phase that have been added to the first one, etc.. we have ten segments but you only see five of them in the graphic tool since we used a step of 0.2*Pi, so there's an overlapping. The total music duration is then 20 seconds
To visualize the projections, click on the [proj] button
Now you may want to export what you just made as a MIDI file: click on the small arrow ([->])button (the one beside the [Ex] button). You will be asked if you want to export this ligne to a variable. No, so just press RETURN. Now you're asked if you want to copy the phrase to a variable. No, so press RETURN again. At last you're asked if you want to write a MIDI file. Yes, so enter the name of the file and press RETURN.
(here is the one I got doing this tutorial: tut.mid )
So this is the fundamental way to use the GUI: define the events scene (or load it if it was defined before or elsewhere), define the geometrical objects (points, circle, ...) that you will need as arguments, then choose a projector and call it with the arguments you want. The result is available as a single phrase or as a more complex data structure callled a ligne. This basic template can be much more complicated, as you will see in the following tutorials. Also, many lignes from different scenes can later on be arranged in a symbolic composition, with the help of another graphic tool.
Going back to basics, let's see the fastest way to generate projections: the "hear ev/seg" mouse mode.
In this mode, click anywhere in the graphic area, draw a segment and release: you will immediately hear the events projected on that segment (you will also see the projections themselves if [proj] is on). Depending on the segment you drawed, you can hear all events or none: try several segments to get the feeling.You can also reconstitute what we did previously by drawing above the segments from the Helice.
Then type this at the console:
Snarph()
... you will have a list of all the phrases you just generated (hmm.. actually this is only true if the parameter AutoSnarph is 1, which is not the default in the distribution. You can change it in the initialisations.k file, or at the console).
To recall phrase number n, simply use Snarph(n)
This is the simplest way to generate phrases and have them immediately available.
Now if you want to save the last projection as a ligne, select the "Ecoute" projector, then click in the [--->] and simply enter "-" at the promp. This is a shortcut for "Ma, Mb", which are the names of the two points defining the segment created in the "hear ev/seg" mode. So RL[2] now contains the ligne Ecoute(Ma,Mb). Click again on [--->], and this time enter "<". RL[3] now contains Ecoute(Mb, Ma). In both cases, Ma and Mb have been replaced with their array values, so that the lignes do not depend on them any more (which will not be true if you directly enter "Ma, Mb" as argument: the ligne Ecoute(Ma,Mb) you'll get then can be [redo]-ne and will change for each new segment).
The shortcuts "-" (or ">") and "<" can be completed with the usual optional arguments: duration, t0 and region. For example, "< , seconds(2)" will project backward on the last segment and scale the rendered phrase so that it lasts 2 seconds.
-- Back to the tutorials index--
-- Back --