GeoMaestro
Tutorial 3: experiments with a loop
Using "phrase to circle"
Setting up a customizable sequencer
Annex: writing scripts for [operation]
The word "loop" suggests circularity, but usually the MIDI sequencers do not emphasize at all this structural aspect; in GeoMaestro, by contrast, an obvious way of playing with repetitions and rythms is to use an actual circle as a support for projections (although it is not the only way to do so). The possibility to develop rythmic patterns that are not mere copies/pastes of a melodic line, and that do not rely on an underlying rigid tempo structure, is in fact at the origin of this composition system. We will illustrate this aspect in this tutorial.
So let's start with a sequencer loop: we will use KeyKit's Kboom tool to create one (it would be exactly the same with one of the Techno tools)
Open KeyKit and arrange your window so that you have a console, the GeoMaestro wrapper GUI, a Kboom tool and a Bang tool. It could look like this:
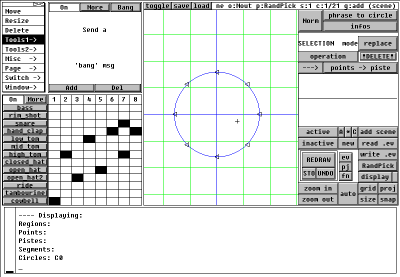
Create a loop in the Kboom and put it in Snarf (menu More > Snarf)
Now in the empty GeoMaestro GUI, select the mouse mode "phrase to circle", display a grid and click on [snap] so that you are in "sticky grid" mode (in the upper info bar you should have a "s:1"). Click close to the origin in the graphic area, and drag to the right so that the segment you're drawing inside the circle is horizontal, then release. The size of the circle doesn't matter, because it will be changed anyway.
Now you're prompted for "ph {ch/map} {auto}". Type the following:
Snarf auto
... this means that the Snarf phrase is going to be spread on a circle and affected to channel 10 (percussions). What we did with the mouse is choose the center for the circle and also its starting point, but the diameter will be {auto}matically calculated so that the perimeter of the circle corresponds to the length of the phrase. Channel 10 is also automatically chosen since it's the MIDI channel of the notes in Snarf.
At the console appears a message saying that the variable PhC_ temporarily holds the circle value. Let's copy it:
C0 = PhC_
... and let's display it: click on [display] and type
C0
Now you should see something like this in the graphic area:
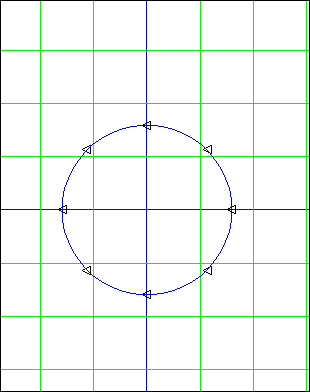
There's one symbol per column actually used in the Kboom tool. If several boxes were checked in the same column, you only see one corresponding symbol because the notes happen at the same time. But you can check using the "info" mouse mode that all the notes are there; you can also use the [*] button to see aliases for these events.
Ok. Let's project the notes on the circle: at the console, define
Nt = 1
then click [pj] then choose the projector "EcouteC", click [--->], and type the following arguments:
C0, Oi, Nt
Now what you have when clicking [hear] should be the same loop you have when clicking [on] in the Kboom tool (except that it's only played once: you can choose the number of repeatitions by changing Nt value at the console and [redo]-ing the ligne)
One way to get sure it's the same thing is to add both Kboom and GUI to the Bang tool (this is done by clicking on [add] in the Bang tool and dragging the mouse into the tool you want to add). We want no latency in the playing, so type this at the console:
TocTocToc = 0
... then click on [bang], and hear the result...
(Since this is a tutorial, here's an other way: click on [->] , press RETURN and export the phrase as variable Direct, then at the console type :Snarf-Direct
... you should have an empty phrase.)
Now that our loop has become 2-dimensionnal, let's play with it !
Try this: at the console, define
CC = Cerc(Or, 0.05)
Nt = 10
then make a "Spiro" projection with the arguments:
CC, C0["r"], 1, 0, 0.2*Pi, Nt, Oi
and display
CC, £2
With projections display on (see [proj]), here's what you should have now:
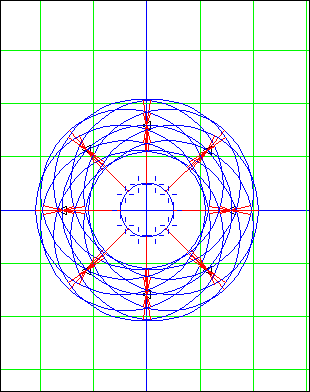
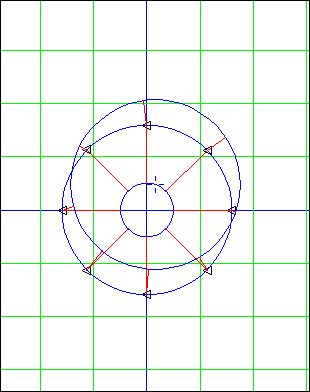
We have ten circles with the same radius as C0, with their centers distributed on the CC, which creates a tempo distortion. Maybe it's clearer if we display only one of them: Click [display] and type
-£, £2i3c
... here's what you should see:
An interesting effect is obtained by combining ligne 2 and 10 times the original loop. To do so, click on [Ex], press RETURN and set the grouping mode to 2 (merge). Then select the ligne "group: -" which refers to both £1 and £2, click [redo] because we need to redo £1 (the first time it was calculated, we had Nt=1 while now Nt=10). Finally click on [hear].
Now let's play a bit with this simple effect. Two parameters are important here: the radius of CC (it was 0.05 in my example) which is responsible for the amount of tempo distortion, and the angle between two consecutive circles in Spiro (it was 0.2*Pi), which determines weither the pattern will be periodical or not. So we need to be able to easily modify these parameters.
At the console, type:
RCC = 0.05
SNC = 10
then define a new projection (it will be £3): use again projector "Spiro" with arguments
(CC=Cerc(Or,RCC)), C0["r"], 1, 0, 2*Pi/SNC, Nt, Oi
As you can see, £3 is the same as £2, except that we can use it again and again, with different values for RCC and SNC. For example, type this at the console:
RCC = 0.1
then [redo] £3 and [hear] the group... that's it... ? not. The group still includes £2, and we want it to be replaced by £3. So click on [Ex] and define the group as:
1, 3
Ok, now if you [hear] the group, it will be £1 and £3 merged together. The display has to be refreshed: click [display] and type:
-CC,-£,CC,£3
Now everything is ready for fast experimentations: you can change the values for Nt, RCC and/or SNC at the console, then [redo] and [hear] the group ("group: 1,3") . If you want to see what it looks like, you simply have to click on [display] and type
::
(yes, there's an history of display commands, and "::" recalls the last one; also ":?" shows the history and ":n" recalls command n)
... even faster: the unlabelled button at the right of [display] recalls the last display command, so there is actually no need to type anything to have the display refreshed: just click there.
... now clicking three buttons in a row is maybe not fast enough for you, so let's do it without leaving the keyboard: just enter xRH at the console. This is a macro, defined in lib/macros.k, which emulates clicking on [redo] then on [hear]... I leave it to you, as an exercise, to hack it so that it also refreshes the display :)
You can also play with the distance effect (although here the distance are very short, so the provided distortion functions default parameters don't make much sense: some tuning is necessary). For example, use "PanWithDist" for Dur, with parameter "0.01" (at the pop-up window). This should give you some stereo.
Many other ways of playing with this circular loop are possible, but instead of introducing them here (I'm confident you will have you own ideas to experiment with), I prefer exploring more comprehensively yet another approach, so that we get deeper into GeoMaestro programming. This will be the object of the second part.
The second part of this tutorial will cover at once many topics of the GeoMaestro system. It will illustrate how you can use together the GUI and the KeyKit langage to build from scratch your own graphic representations of musical data, allowing a potentially limitless game of exploration of different points of views. A bit of programming is involved here, and you should also be ready to completely drop your habits about how a sequencer should look like, as we are going to create an original sequencer with completely unique features.
First of all, let's extend the principle we saw in the first part. Use the [display] button to get rid of everything but events ("--"); then click [ev] and [new] to start again from scratch.
Click on [snap] so that you are "in stick to grid" mode, Snarf again the phrase from the Kboom tool and this time import it five times
on circles centered in Or with radius 0.1 to 0.5; at each prompt, simply type "$": this is a shortcut for "Snarf".
You can get rid of the other tools in the page and resize the GUI so that it gets larger.
Here's what you should see
(after zooming out):
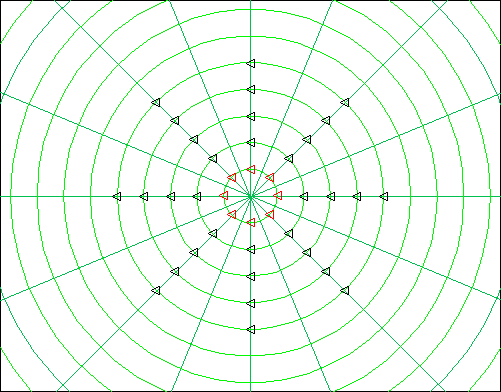
Get the idea ? We could use this representation for a 5-steps sequencer... ok, maybe it's not obvious at first.
To start with, how could we listen to one circle and not to the others ? By using a region to restrict the event scene to a ring-like subset. Type this at the console:
function Ring(n) {return(RegionET(RDisque(Or,0.1*n-0.05,"!"),RDisque(Or,0.1*n+0.05)))}
(instead of typing this code, you can also select and copy the above line from this page, go to KeyKit console and press ESC, paste the function in the first line of the editor, save the file and close the editor, go back to KeyKit and press ESC again; see here for a presentation of this feature)
also type:
FastRedraw = 1
... because we are going to display a lot of things
Now [display]:
Ring(3)
You should see this:
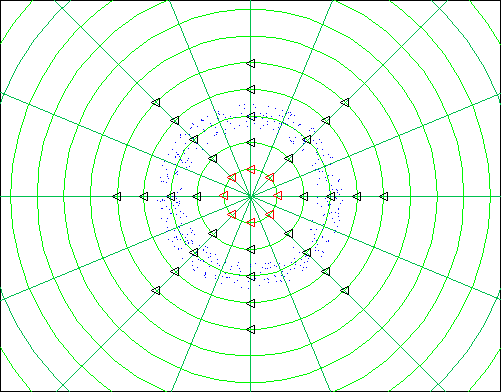
(if you don't like the way the region looks you're free to play with the parameters RegDensity which controls its density, and RegFill which defines the kind of symbols used to represent the region)
Now do a "EcouteC" projection with the following arguments:
Cerc(Or, 0.3), Oi, 1, Peri(C0)*CPCM, 0, Ring(3)
... you should [hear] our same old loop again. EcouteC() has been performed on the third circle, with an absolute duration parameter making duration the same as it was when events were on the C0 circle, and with a region parameter selecting only the events from the third circle.
So the general function we can use to listen to events in circle n only is:
EcouteC(Cerc(Or,0.1*n), Oi, 1, 192, 0, Ring(n))
(192 was the value of CPCM*Peri(C0) )
.. and loops 1 to 5 can be listen to with the following code:
Loops = ''
for (n=1; n<=5; n++) Loops += EcouteC(Cerc(Or,0.1*n), Oi, 1, 192, 0, Ring(n))["ph"]
Putting all this together, we can now open a text editor and edit the following sequencer.k file in the COMPOS directory (actually, this is not necessary, since all code in this tutorial can be found in the file userlib/tut3_sequencer.k, so that the following functions are already available):
| |
function Ring(n)
{
	return(RegionET( RDisque(Or,0.1*n-0.05,"!"), RDisque(Or,0.1*n+0.05)))
}

function NListen(n, duration)
{
	# if only one argument, keep 192 as "duration":
	if (nargs() == 1) duration = 192

	# returns the phrase:
	return(EcouteC(Cerc(Or,0.1*n), Oi, 1, duration, 0, Ring(n))["ph"])
}

function LoopN2P(n,p, ...)
{
	loops = ''
	for (i=n; i<=p; i++)
		loops += NListen(i, ...)

	return(loops)
}
|
|
Let's make all these functions available from the console:
#include sequencer.k
We have now a circular sequencer ! You can edit events on the polar grid, and use the function LoopN2P() to play loops from ring number n to ring number p.
When I say "edit", it means, of course, changing or modifying the event's nodurs, but also, unlike what's possible with a hard-coded sequencer, moving the events along the circles so that they are off-beat: the main interest of the circular (or "polar") view is a clear representations of phase relationships in the loop structure: two events at the opposite side of a diameter are in opposite phase. "Editing" can also mean adding and/or removing events to the loop, or mixing drums (channel 10) with other instruments (it can even be much more complicated if you use events with scripts, but this is not the topic of this tutorial)
This may be a very interesting way to compose loops, but it has some drawbacks, the main one being that you cannot add circles forever and keep the thingy easy to use. So we are going to improve it by adding a "normal" linear sequencer mode to it.
In the console, type this:
Xoff = 0.9
Yoff = 1
SWidth = 1
ToL = "T_=Getpolar(X_,Y_); X_=Xoff+T_[Rs]; Y_=Yoff+SWidth*T_[THs]/(2*Pi)"
You may have recognized a script for [operation]... let's try it! Select all events then click on [operation] and enter:
:ToL
The events have moved ! They're now nicely arranged in vertical lines, one per previous circle (if you don't see them, just zoom out). The ToL ("To Linear") script changes loops representations from polar to linear. We need the opposite action:
ToP = "T_=Setpolar(X_-Xoff, 2*Pi*(Y_-Yoff)/float(SWidth)); X_=T_[Xs]; Y_=T_[Ys]"
Try it... the events should go back to their previous positions.
Note: You may have a look at this tutorial annex to have a detailed explanation on the way these scripts work; it's too long to be detailed here.
Also note that you actually don't have to type all this stuff: its' been coded in userlib/tut3_sequencer.k, so that it is enough to do a Tutorial3()
call which will initialize everything introduced here. What you should do is have a look at the content of this file...
Now we can use ToL and ToP to toggle between the two representations.
Since the linear representation can be as long as we want, while the polar one is only useful with a limited number of loops, it would be nice to be able to display only part of the linear stuff in the polar representation. Let's do so! We just have to introduce two new parameters: NLoop1 and NLoop2.
Here are the new scripts (split here in several lines for commodity):
ToL = 	"T_=Getpolar(X_,Y_);
	X_=Xoff+T_[Rs]+(NLoop1-1)*0.1;
	Y_=Yoff+SWidth*T_[THs]/(2*Pi)"

ToP = 	"if ((X_>=0.1*NLoop1+Xoff) && (X_<=0.1*NLoop2+Xoff))
	 {T_=Setpolar(X_-Xoff-0.1*(NLoop1-1),2*Pi*(Y_-Yoff)/float(SWidth));
	 X_=T_[Xs]; Y_=T_[Ys]}"
... now ToP will represent in the polar way only loops NLoop1 to NLoop2
Let's see this on an example: at the console, initialize
NLoop1 = 1
NLoop2 = 5
Do the ":ToL" [operation] script on all events. Choose a rectangular precise [grid]. You should have this:
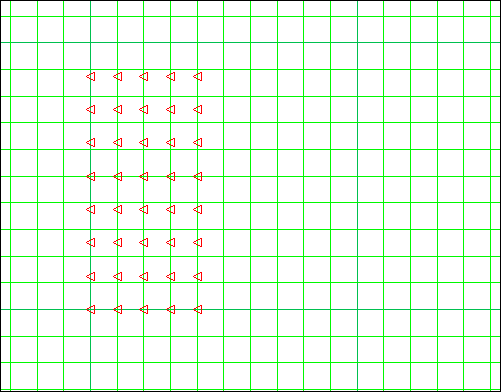
In "copy(m) selection" mouse mode, click once and enter 0.5 0 for "dx dy". Then select all events, click again and enter 1 0. One more time: select all, then copy(m) with 2 0. Now you have this:
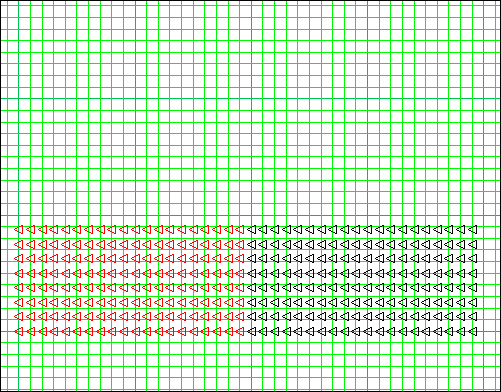
We have now 40 loops ! You can edit them right here, in this representation, and also select a part of them and edit it in the polar representation.
For example, set
NLoop1 = 15
NLoop2 = 25
then select all events and do [operation] :
:ToP
With a polar grid, this looks like:
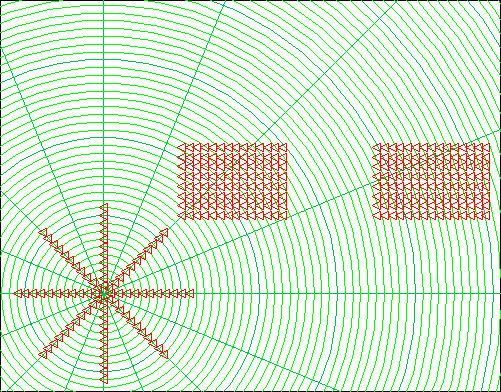
To restore the big ribbon, simply select all events in the polar representation and do a ":ToL" [operation] script.
For our sequencer to be complete, we need a way to play the loops while they are in the linear representation. This is a very similar operation as for the previous code, we just use rectangular regions instead of ring-like ones. So add this code to the sequencer.k file:
| |
function LNListen(n, duration)
{
	# if only one argument, keep 192 as "duration":
	if (nargs() == 1) duration = 192

	# returns the phrase:
	a = xyd(Xoff+(n-1)*0.1, Yoff+SWidth)
	b = xyd(Xoff+(n-1)*0.1, Yoff)
	ra = PlusP(a,["x"=-0.05,"y"=0])
	rb = PlusP(b,["x"=0.05,"y"=0])
	return(Ecoute(a, b, duration, 0, RRect(ra,rb))["ph"])
}

function LLoopN2P(n,p, ...)
{
	loops = ''
	for (i=n; i<=p; i++)
		loops += LNListen(i, ...)

	return(loops)
}
|
|
Let's summarise what we have now:
- The variables Xoff, Yoff and SWidth are used to define a vertical (virtual) segment; it is the starting reference for the linear sequencer: you can draw events on segments parrallel to it, and they will be affected to loop number n if their x-value is Xoff+n*0.1 and if their y-value belong to the range Yoff to Yoff+SWidth
- You can listen to the loops number n1 to n2 by calling the function LLoopN2P(n1,n2)
- You can extract a part of this sequencer, from loop n1 to n2, by setting NLoop1=n1 and NLoop2=n2, selecting the linear sequencer and executing the ToP [operation] script. These loops will become represented in the polar sequencer mode, as loops number 1 to n2-n1+1.
- You can listen to loops n1 to n2 in the polar sequencer by calling the function LoopN2P(n1,n2)
- You can edit in any manner you want events in both sequencer; loops are represented either as segments or as circle and, unlike any other sequencer that I know of, the time value of their notes can vary continuously: there are no boxes here. But we can use the background polar or rectangular grid to simulate boxes, as a reference for the tempo
- You can put back the extracted loops in the linear sequencer by selecting all events in the polar sequencer and executing the ToL script
- You can change the tempo by giving a third argument to LoopN2P() and LLoopN2P()
- You can completely program the sequencer by including calls to LLoopN2P() in another KeyKit program
- etc... there are many ways to improve this basic but unusual sequencer. This tutorial explained the global framework for such improvements: how to define and use scripts and functions. As a complementary exercise, I would suggest writing a projector making the LLoopN2P() function available from the GUI... (well, I did write this kind of projectors, actually: check LSeq and CSeq. Other sequencer-like projectors are Batteur and Goutte)
In order to save this work, we need to register the global variables used in the scripts and the functions, so that we don't have to define them again and again. This is done with the following command at the console:
RemVAR("Xoff,Yoff,SWidth,NLoop1,NLoop2,ToL,ToP")
(ToL and ToP should have been automatically registered already, since we used them as [operation] arguments)
Now you can save the page (Page -> Write) and keep the sequencer available for another session.
Annex: [operation] scripts
The [operation] button basically asks for a KeyKit expression and evaluates it on the selected events, using specific keywords to address directly their structure. All of this is described here, in the GUI documentation.
So here I'll just give a few tips that may not be obvious:
- A script is a one-line KeyKit expression: to separate two instructions (which is done by going to next line in a KeyKit function), you must use a ";" like in C.
- The script can not handle double quotes, so string indexes in arrays (there are lots of them in GeoMaestro) must be refered to using the variables that are listed by a NoDoubleQuotes() call: for example, PHs for "ph". More generally, all strings you want to access from a script must have been stored previously in global variables.
- The compact conditonal statement test is true ? yes : no is very useful. For example:
C_==1 ? Y_+=1 : Y_-=1
moves upward all events in channel 1, and downward all other selected events/objects.
The way the script works is the following: for each selected active event (that is, events whose "s" and "actif" fields are 1), the keywords X_, Y_, N_, C_, etc.. are replaced by their value for that event:
X_ = Ev[ch][ne]["x"]
Y_ = Ev[ch][ne]["y"]
N_ = Ev[ch][ne]["nodur"]
C_ = ch
S_= 1
A_ = 1
P_ = Ev[ch][ne]["script"] 		# only if a "script" is there, else P_=""
L_ = Ev[ch][ne]["label"] 		# only if a "label" is there, else L_=""
O_ = ArCopy(Ev[ch][ne]["score"])	# only if a "score" is there, else O_ = [0=0]
then the expression is evaluated, and if the values of X_, Y_, etc... did change meanwhile, the change is translated into the Ev array (if C_ change, the event will be moved to another channel)
Note that the script is also applied to selected objects (points, pistes and circles): only the X_, Y_ and S_ keywords are relevant in this case, while you can use the conventionnal fact that C_ = 0 for an object to effect them differently. For example
if (C_ == 0) X_+=1
... will only move the objects in the selection.
-- Back to the tutorials index--
-- Back --


