GeoMaestro
Hints and tips
You will find here discussions about different aspects of the GeoMaestro system, and how to use it at best. Known troubles will also be discussed here
The initialisation steps
Here are the different steps of initialisation of the KeyKit/GeoMaestro system, for KeyKit version 7.1 and newer:
- the function
keylocal() is called.
- the function
geoprerc() is executed (its code lives in the lib/geomaestro.k file from the KeyKit distribution);
here is defined ACPATCHES.
- KeyKit starts
- the function
geopostrc() (again in lib/geomaestro.k) is executed;
here starts GeoMaestro, initialised by the function Go() (in GeoMaestro/lib/initialisations.k).
All the following happens within Go():
- the macros in GeoMaesto/lib/macros.k are defined
- the parameters of GeoMaestro are set by
InitConstantes() (in GeoMaestro/lib/initialisations.k).
It is there that you can customize the system (although most parameters values should better be overiden within GeoPostInit(): see the next steps...)
- if a function called
InitVAR() exists (it could be anywhere but normally it's in the BASE directory), it is executed:
this sets the values of a bunch of global variables (see the GVARS array discussion for more)
- GeoMaestro checks the content of the
BASE directory:
if an init.ev is present, the event scene is read from this file;
if an init.df is present, the distortion functions settings are read there;
if an init.geo is present, definitions of geometrical objects (like the points Or, Oi, Oj, etc...) are read there (note that they will overwrite the objects defined by InitVAR() which have the same name)
- if a function called
GeoPostInit() exists, it is executed.
This is where you should add your own initial settings, so the code for GeoPostInit() should be in your GeoMaestro/userlib directory, which is the case by default.
The function created by the Customization tool should be called here (again, this is the case by default).
One important consequence of the first steps is that you can not open KeyKit on a page containing a GeoMaestro GUI (by double clicking on a *.kp file, for example), because we have to wait geopostrc() for GeoMaestro to be started. So if you saved a work as *.kp file(s) containing a GUI, you have to start KeyKit first, then read the page(s) afterward.
The different GUIs and their relationships
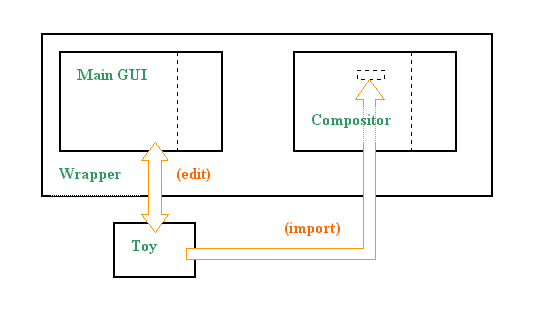
The above diagram shows the relationships between the four GUIs of the system: the main GUI and the Compositor are two completely different tools, wrapped into one through the wrapper GUI. A Toy is a standalone KeyKit tool whose closure can be edited from the main GUI. As many other KeyKit tools, it can also be imported as a (T) box in the Compositor.
Saving and restoring one's work
The best way to get sure that everything you have done is saved is to actually save it yourself, using the LOG system for the variables declarations, the [write .ev] button for the Ev scene, the [S] button for the distortion functions, the RL [->] button or the Group Tool to save your phrases as MIDI files, etc... this is tedious but you can control that you are not forgetting anything important.
You can also rely on KeyKit pages features: writing a page (Root menu > Page > Write) dumps all the tools it contains so that they can be restored when you read the page (Root menu > Page > Read). GeoMaestro makes use of this system to save its whole configuration and memories. This is a fast and reliable procedure, as long as you take care of the following points:
- the GUI is a kind of "headquarter" for GeoMaestro. When it is dumped (that is, when you write a page containing the tool), it saves all possible data along, including the Ev scene and most of the GeoMaestro parameters.
- among what is saved is the GVARS array, which is a storage place for important variables; you definitely need to read this for a good understanding of its behaviour.
- only global variables (more exactly, only variables whose names start with an upper-case letter) can be registered in GVARS. Do not use a local variable for an important data (the best is simply to never use local variables !)
- do not use several GUI (by the way, note that they would have to be in different pages), as it may become difficult to keep track of what is saved by which tool.
NOTE: the way KeyKit saves and restores pages makes it impossible to do it many times: after a while you can't read the pages any more; see the known bug section for fixing this problem.
If you're using the wrapper tool, you can easily [save] and [read] compositions in the *.gmt file format (a plain array containing the dumps of the two GUIs). This is definitely the best way to save and restore one's work.
Managing the GVARS array
The GVARS array is the place where are kept in memory (or "registered") the global variables used in your work. This includes phrases, geometrical objects, like points, circles, etc (note that "object" here is not used in a programming sense: all these variables are arrays), scripts for [operation], and anything else you may want to save from one session to another.
Because it is not possible to automatically track all necessary variables, the GVARS management has to be completed by hand; otherwise you may loose important data when you close KeyKit, even though you did save your work by writing one or several KeyKit pages.
The best way to see the content of the GVARS array is to use the commands
Notepad(GVARS)
Notepad(GVARS, 1)	#  macro shortcut: xVAR
The first one will display in a text editor the whole array, which can be quite large; the second one only lists the first level of its structure, giving you the names for all registered variables.
You can also use ListVAR() which will print the list of the registered variables at the console, along with their types
The function for registering variables is RemVAR(); it take a single argument, a string containing variable names separated by commas:
RemVAR("A,B,L1")
... registers variables A, B and L1.
If a variable was already registered, calling RemVAR() will update the value in the GVARS array so that it fits the variable current value. This is not automatic !
The GUI internally calls RemVAR() everytime it is presented a new variable, so a lot if not all of your variables should be automatically registered while you use them in the GUI. But don't rely on this and check that everything important is registered before closing KeyKit ! (see the previous topic: saving and restoring one's work)
Now, some variables are saved independently, like the RL, SNARF, DISP, FIF, FTT and LOG arrays, and we don't want to have them saved twice (especially if they're big arrays). We don't want GVARS itself to be registered, either !. So the RemVAR() function calls the NoRemVARforthis() one, which returns an array of variables which will not be registered. You can add your own exceptions there, by hacking the code for NoRemVARforthis(), in lib/console.k
Since the values of the variables registered in GVARS can change, we need the following functions:
ReVAR()
ReVAR(V)
UpdateVAR()
UpdateVAR(V)
ReVAR() sets back the values of all registered variables to their values in GVARS: it overrides their current value. This is a kind of "reset" thing. If you give it a string argument V, only the variables in V (same syntax as RemVAR()) will be set back to their registered values.
UdpateVAR() does exactly the opposite: it changes the values in the GVARS array so that they fit the current values of the registered variables. This function is called by the GUI when it is dumped, so you don't need to call it if you save your work by writing the page.
You can save the variables in the GVARS array as a KeyKit function that will be called whenever you start GeoMaestro, with HardCodeVAR():
HardCodeVAR()
HardCodeVAR(fname, dir)
... in the first case, this creates the function InitVAR() in BASE+InitVAR.k; in the second case, it creates a function (fname)() in the file dir+fname+".k" (which will not be automatically called, but reserved for your own usage)
On Windows, another way to export the content of the GVARS array is performed by a ClipVAR() call, which writes into the clipboard buffer a bunch of variable definitions. This is intended for interactive use: do a Ctrl-V into any text editor to retrieve the variables.
To unregister variables, use the ForgetVAR() function:
ForgetVAR("A, B")
... will remove A and B from the GVARS array.
A variation is ForgetVAR_called() which takes a regular expression as its argument:
ForgetVAR_called("_")
... will remove all variables whose names include a "_" from the GVARS array.
Eventually, we have utilities for detecting and/or removing big arrays from GVARS:
An array in KeyKit is associative, which means that, for example, Arr[1][1] and Arr[1][3] may be defined, while Arr[1][2] will not (what is called "array" in KeyKit is called "hash" in other langages). Only the elements that were actually defined exists: so the structure of such arrays is a tree-like one, not a matrix, as you can see by using Notepad().
The TreeInfos() function gives information about the tree structure of an array: it returns an array with three fields: "prof" is the depth of the tree (a list, or one-dimensionnal array, as a depth of 1); "tr" is the number or elements which are themselves arrays (so they are part of the trunc of the tree); "ex" is the number of extremities, (the leaves of the tree), that is the elements which are not arrays.
For example:
Arr = [1="leaf", 2=[1="leaf again", 3="another leaf", 10=[5="yet another one"]]]
print(TreeInfos(Arr))
... will return:
["ex"=4,"prof"=3,"tr"=2]
We can decide that an array is "big" if either "tr" or "ex" is more than an arbitrary integer n. The function: BigVAR(n)
... lists the names of all registered variables which are "big" arrays. If you don't give it an argument, n will be set to 100.
The function: ForgetBigVAR(n)
...unregisters all "big" variables. As previously, if you don't give a value to n it will be set to 100.
To manage the registered variables from a KeyKit session to another, use the functions
SaveVAR(fname)
LoadVAR(fname)
MergeVAR(fname, mode)
The two first ones are self-explanatory.
MergeVAR() merges the content of the file fname to the current GVARS and, depending on mode, either sets the values for common items from the file (if mode is 1) or keeps their current value (if mode is 0)
The .var extention is appended to fname or replace its previous extention. See importing a (G) box in the Compositor tool for an example of use for such a file.
To get a list of all functions relative to the management of GVARS, use the on-line help system:
functype("GVARS")
Preventing the GUI from slowing down (is it possible ?)
One problem in the GeoMaestro system is the fact that calculations get slower and slower when you heavily use the GUI. I frequently find that projections can get as much as 10 times slower after a short period of time when using projectors that generates large lignes... this is really bad.
If you don't need to display the projection supports, set NoInterInLignes to 1. This will drastically reduce the amount of internal data and speed up the calculations.
Here are a few more ideas:
- If things get really bad, remove all unnecessary big variables in GVARS, kill all unnecessary lignes stored in the GUI, save your work, quit KeyKit and start another session. (Note: be careful if you often save the same *.kp page, as it can become impossible to read it back after a while: see the known bugs section for a fix)
- The GUI seems definitely responsible for much of the slowing down: if you're going to create a complex composition, use it only for setting things up and testing, then program the main calculations in a text editor as a KeyKit function (see tutorial 2 for a basic example); very likely, this function will get calculated much faster.
- If you don't need the extra info lignes provide, get directly phrases from projectors better than lignes:
ph = Helice(...)[PHs] instead of lig = Helice(...). Phrases are much smaller variables than lignes (except again if NoInterInLignes is 1).
(more here later ...)
Using pistes
Pistes, as described here, are simply lists of points. They can serve many purposes: some projectors (like Vague, MetaRails, EcPiste, RandConnect, EarWalk, MultiP) ask them for arguments, more generally you would use them to set up geometrical structures used as a reference for later calculations.
Tutorial 7 explains the handling of pistes from the GUI.
I will describe here more advanced functions supposed to be used at the console or within KeyKit functions. They are defined in the file lib/curves.k:
Piste(...)
ToPiste(...)
ParaPiste(...)
InvPiste(...)
ConvPiste(...)
Piste(xdek, ydek, kmin, kmax, deltak)
... lets you define on the fly a piste following a parametric curve. The global variables K will be used as parameter, along with X and Y, so be sure you don't use them elsewhere. xdek and ydek are strings holding the equations "X= .." and "Y= .."
example:
Pcir = Piste("X= 5*cos(K)", "Y= 5*sin(K)", 0, 2*Pi, 0.01*Pi)
ToPiste(...)
... takes the points you give as argument and return a piste
ParaPiste(t1, t2, dt, ft, ...)
... returns a piste following a parametric curve, this time defined by an external function ft. ft must be a function whose first parameter is t; it must return a point. ft will be called for t = t1 to t2 with a step dt, the ... stands for any other arguments required by ft.
example:
ParaPiste(0, 2*Pi, 0.01*Pi, Cercle, 5)
... should return the same piste as the previous example.
The following functions, written in lib/curves.k, are supposed to be used as argument for ParaPiste: note that their center is CentrePolaire, the center point for the polar grid (by default identical to Or, the origin):
Cercle(t, radius, toffset)
Spirale(t, rf, toffset)
Rose(t, ra, nf, toffset)
RoseP(t, ro, ra, nf, toffset)
Cosi(t, a, b, m, c, d, n)
Lissajous(t, rx, ry, nx, ny)
Trochoid(t, a, b)
Droite(t, a, b)
InvPiste(p, cer)
... returns the piste p inverted relatively to the circle cer (
see here for an introduction to inversion).
For example, the image on this page is a set of pistes created by the following commands:
RosePiste = ParaPiste(0, Pi, 0.03*Pi, Rose, 2, 3)
CerPiste = ParaPiste(0, 2*Pi, 0.1*Pi, Cercle, 3)
InvRosePiste = []
for (i=1; i<=20; i++)
	InvRosePiste[i] = InvPiste(RosePiste, Cerc(CerPiste[i],3))
To display it in the GUI, click on [display] and type
*InvRosePiste
ConvPiste(p1, p2)
... returns the piste p1 convolved with the piste p2
Regions
Regions are the most powerful way available in GeoMaestro to precisely define parts of the event scene. They can be used to affect a specific behavior to some events, to restrict the operation of a projector (see Brown() for an example), to create sophisticated distortion functions, or in any other case where it is necessary to draw clear boundaries.
Basically, a region is simply a set of tests on Xx_, Yy_, Cc_ where (Xx_, Yy_) are the coordinates of a point or an event and Cc_ an evant channel value. The tests are strings, arranged in a list (a 1-D array) and logically articulated by OR operators: that is, if at least one test in the list returns True, the (Xx_,Yy_,Cc_) triplet belongs to the region defined by the list.
As an example, here is a region:
[0 = 2,							# number of tests in the region
1 = "(D_ = sqrt(Xx_*Xx_+Yy_*Yy_)) >= 1 && D_<=2 && Yy_>0",	# first test: upper half of a ring
2 = "Xx_<0 && Yy_<0 && D_<=1"]				# second test: quarter of a disk
and here is the area it represents:
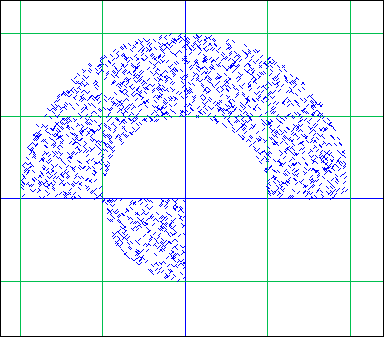
In this example, the Cc_ parameter is not used.
You can see that we use the temporary variable D_: note that all temporary variables must be global, and also that it's safer to add one or more "_" to their name, so that a name conflict with an already existing user or KeyKit variable is improbable (for GeoMaestro variables, check a list of the reserved ones in the lib/initialisations.k file)
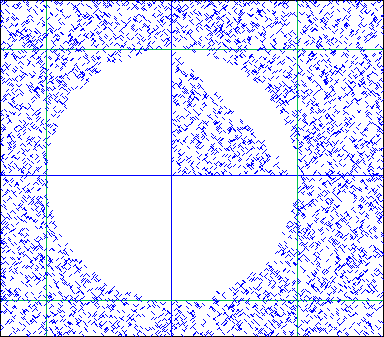
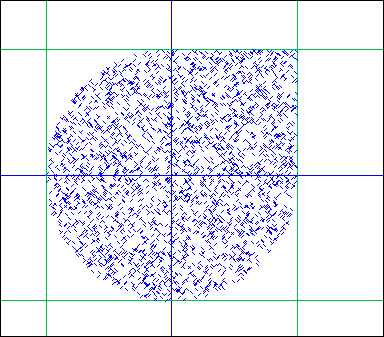
All images in this sections are produced by the GUI with a RegDensity parameter of 0.06, in mode RegFill = 3
Relative mode (for projections only):
While a region is by default a static area, its location can also be set relatively to the support when projecting. Let's say that RD is a disk region:
RD = RDisque(Or, 2)
...its center is the origin and its radius is 2.
When used as an optional region argument in a projector call, only the events located into this disk will be projected on the projector support.
Now if we set this region in relative mode, by typing:
RD["rel"] = 1
... its meaning as an optional argument in a projector call changes: this time, only the events located into the disk of radius 2 centered on their own projection on the support will be actually projected (the projected events will be the ones less than 2 units away from the support). The region follows the listening point on the support, so to say.
To set the region back to its absolute mode, type
RD["rel"] = 0
Related functions:
Region(x, y, ch, reg)
x, y: floats
ch: integer (1 to NbCan)
reg: region
Returns 1 if the triplet (x,y,ch) belongs to reg, else returns 0
...this is the basic function for using regions in GeoMaestro
RegionPoint(pt, region)
pt: point
reg: region
This is a simpler version of Region(). It checks weither point pt belongs to reg (so here reg should be a pure geometrical region: with no test on the channel value)
RCanal(ch, ...)		# region is the whole ch channel
RDisque(c, r, ...)	# disk centered on c with radius r
RRect(a, b, ...)	# rectangle whose corners are a and b
RTri(a, b, c, ...)	# triangle whose summits are a,b and c
a, b, c: points
r: float
ch: integer (1 to NbCan)
These functions returns a region, either geometrical (disk, triangle, rectangle) or based on the channel value; they can also be combined
the (...) optional arguments are (op, reg):
op: string ("" or "!")
reg: region
op is an operator: if it is set to "!", the complementary of the region is returned.
reg is the optional region we're adding to (OR operator)
Example:
Or = xy(0, 0)
Oi = xy(0, 1)
Oj = xy(1, 0)
Reg1 = RTri(Or, Oi, Oj, "", RDisque(Or, 1, "!"))
Reg2 = RRect(Oi, Oj, "", RDisque(Or, 1))
... Reg1 is the area defined by the union of the whole plane minus the disk centered in Or with radius 1 (kind of a hole !) and the triangle (Or, Oi, Oj) (which is in the hole!). So it looks like the blue part in this picture:
... while Reg2 looks like this:
The above examples Reg1 and Reg2 shows AND-combinations of regions obtained within the definition of a new sub-region. But you can also combinate with OR or AND operators already existing regions with the following functions:
RegionET(reg1, reg2 , ...)
RegionOU(reg1, reg2)

reg1, reg2: regions
(...): op, reg (see above)
Intersection (ET=AND) and union (OU=OR) of two regions.
Let's see on a few examples:
this defines a ring:
ring = RegionET(RDisque(Or, 1, "!"), RDisque(Or, 2))
here we add the same ring to an existing "blob":
blob = RegionET(RDisque(Or, 1, "!"), RDisque(Or, 2), "", blob)
here is the region formed by two intersecting rings:
ring1 = RegionET(RDisque(Or, 1, "!"), RDisque(Or, 2))
ring2 = RegionET(RDisque(Oi, 1,  "!"), RDisque(Oi, 2))
inter = RegionET(ring1, ring2)
...this to add inter to blob:
blob = RegionOU(inter, blob)
I suggest you try these examples at the console; to display regions in the GUI, click on [display] and enter the region's name.
Managing tempo changes
The main time unit in GeoMaestro is KeyKit's click. The number you see after the t, d or l in a note's code is always a number of clicks:
'ao5d562t10, l96'
... is a note whose pitch is A (octave 5), duration is 562 clicks, starting time is 10 clicks and length is 96 clicks (length is only meaningful when it comes to adding phrases with the + operator; see KeyKit documentation)
The CPCM variable, which sets the ratio between a number of clicks and one unit of distance, is by default:
CPCM = seconds(1)
... where seconds(1) returns the number of clicks in one second. So in this case one GeoMaestro unit is one second long (when the duration parameter is not used or is 0).
Here is the trick: this is only true if the tempo does not change !
The tempo sets the duration of a click (which depends also on the value of the Clicks variable, see KeyKit documentation for more). So everything based on clicks is subject to change when the tempo changes. You can use the KeyKit tempo() function to have the current tempo and/or set a new one:
tempo()
... return the current tempo
tempo(500000)
... sets the tempo to 500000 (and return its previous value)
Everything is simple as long as the tempo does not change during a GeoMaestro session.... but this is not always the case
First, if you use the Tempo Tool, you will change it (obvious, I guess...). But you will also change it if you play with realmidi() a phrase embodying a tempo message. For example, the midi file Bach.mid used in tutorial 4 includes at its beginning the following message:
'"Tempo=857142"'
... if you play this file with the Group Tool, the tempo will be set to 857142. Most MIDI files have one or more tempo messages, so using GeoMaestro in parallel with the Group Tool while reading MIDI file is a good way to have KeyKit tempo change very often.
Since GeoMaestro is supposed to be used with a constant tempo ("tempo" is not a GeoMaestro concept !), you may find interesting to set the parameter KeepInitialTempo to 1 (this is actually its default value). Then, everytime the GUI is redrawed, the tempo is checked: if it is not the same as it was at the beginning, it is changed back, and a message is displayed at the console to keep you informed.
On the other hand, you may want to include a phrase from a MIDI file in a GeoMaestro scene (see the tutorial 4 for an example). Use the function MIDIfile() to read it; it will automatically convert it to the current tempo.
Using the GeoMaestro channels
As you may already know, the events scene is divided into a number NbCan of channels, which is more than 16 (by default it's 20): in this manual, the 16 first ones are often called MIDI channels, while the other ones are called GeoMaestro channels.
Internally, the only difference between these two kinds of channels is that the MIDI channels contains events that will indeed be affected to the corresponding MIDI channel (and these events' nodurs should always be phrases with channel 1 attributes), while the events in GeoMaestro channels will eventually be distributed into MIDI channel in a less straightforward way (and these events' nodurs must make explicit the channels they want to use)
So, for example, if
Ev[5][1]["nodur"] = 'a'
... this note when projected (without distortions) will be 'ac5'
while
Ev[17][1]["nodur"] = 'a, bc5'
... will become 'a' (on channel 1) and 'b' (on channel 5)
Now, what's the interest of these extra non-MIDI channels ?
GeoMaestro is a rather open system, and its features are intended to be as general-purpose as possible. Still, here are what I would call "standard" usages of extra channels:
1) having room for more distortions
Let's say you have 16 instruments in the MIDI channels (that is, 16 bank/program change messages in the "PAC" fields: Ev[1]["PAC"], Ev[2]["PAC"],... Ev[16]["PAC"]
Now if you want to use different types of distortions settings for the instrument in channel 5, you can use channel 17 and store there events whose nodurs are notes from channel 5 (you must explicit the channel attribute: 'ac5' instead of 'a'). No "PAC" has to be set to channel 17, since all its notes will go to channel 5 and be played by the corresponding instrument. The distortion settings for channel 17 will only effect the notes from events in channel 17
So you'll have two distinct distortion settings for one single instrument, and you choose which settings will effect a given event by deciding weither this event belongs to channel 5 or to channel 17. Of course you can have as many settings as you want since the number of extra channels is not limited.
2) having room for more instruments
This is more tricky. It involves having different instruments sharing the same MIDI channels, by putting bank/program changes in the nodurs themselves.
Let's say that, again, all 16 MIDI channels are affected to different instruments. If channel 5 uses a piano patch, it means that the program message in Ev[5]["PAC"], setting the patch as a piano, is sent at the beginning of the rendered phrase. It is not send again. Now if in channel 5 we have an event whose nodur contains a patch message for a xylophone, the eventual rendered phrase will start with a piano and somewhere switch to a xylophone, which is not what we want: we want the xylophone event to sound like a xylophone, and the piano events to sound like a piano, even though there's a xylophone in the middle.
In order to have this, the "PAC" piano message must be restored after the "alien" xylophone note. This is done with the "RestorePAC" distortion function for the Mer array. This distortion function send a "PAC" message at the alien note starting time plus DECAY_TIME clicks. DECAY_TIME has to be long enough so that the alien note is fully played, and it must be short enough so that the program change happens before the next piano note. Of course, it may be just impossible to do so: the piano notes may be too close one from the other, or the alien sound may be too long. Anyway that's how you can tune this distortion function.
You may wonder what this has to do with the extra channels... well, not much directly, but in practice it is very convenient to have each instrument in a different channel, or at least to keep "pure" the MIDI channels. So in the previous example, it's better to put the xylophone event in channel 17 so that we know that all events in channel 5 are genuine piano notes, while alien xylophone (or other instrument) events are stored in channel 17. Also, this liberates the Mer distortion function for channel 5, which can be anything, while the Mer[17] will be "RestorePAC"
3) switching events on and off according to the projector call
Remember than projectors have a region parameter setting which part of the event scene they're listening to. Regions are sets of tests that takes Xx_, Yy_ and Cc_ parameters. By using the Cc_ parameter, you can split your scene in different sets of channels so that projectors can be tuned to specific events only.
For example, lets say that drums and percussions are in channels 10 and 20; you can create the regions
Drums = [0=1, 1="Cc_==10 || Cc_==20"]
NoDrums = [0=1, 1="Cc_!=10 && Cc_!=20"]
so that a projector call like
Ecoute(A, B, 0, 0, Drums)
... will only listen to the percussion channels
while
Ecoute(A, B, 0, 0, NoDrums)
... will listen to all the other channels
Note that when no region parameter is given, the projector uses DefRegion, defined in lib/initialisations.k (by default it is Tout, that is [0=0], the whole scene). So in our example, if you set
DefRegion = NoDrums
... then no region parameters will mean no drums for your projectors.
Generating stochastic distribution of events with CMask
CMask is a powerful freeware program generating Csound scores from a parameter file where are described stochastic distributions for the various p-fields. It is mainly used to create scores for granular synthesis or other kinds of sound textures.
Since I'm a lazy programmer (with no real inclination towards statistics and random distributions), this is the program I use to generate random distributions of events within GeoMaestro. See the code in lib/cmask_utils.k for details; the most useful function is
GetStochEv(fname)
... which calls CMask on the parameter file fname, then analyses the returned score and translates it as a bunch of new events. For this to work, you must of course have CMask installed and its executable name (or a batch file) should be stored in the global variable CALLCMASK (be careful to check that it operates inside the DATA directory).
A few examples files are provided in the distribution: Cmaskn.txt in the /data directory. Just open the main GUI on a empty scene and type
GetStochEv("Cmask4.txt")
... to have an example. Look at the comments in the parameter files to understand the usage of the different p-fields.
The idea is simply to map the p-fields from the CMask score to event data: duration, volume and pitch for the nodur, plus channel and (x,y) position. Moreover, it is possible to use polar coordinates and to have the polar center itself be dependent on a stochastic process.
The documentation for CMask is comprehensive, so I'll stop here...
Portable compositions
In a composition (a graph of boxes edited with the Compositor tool), some boxes may reference files such as sounds or Csound orchestras and scores. In order to make it possible to port the compositions to other KeyKit/GeoMaestro installations, or to other systems (for example, I use both Windows and Linux as operating systems, on the same computer, and I want to work on my compositions from both of these systems at the same time), the Compositor translates all file names it identifies in a specific format where the path is replaced by the name of a global variable.
for example, the filename
"c:\audio\KeyKit\contrib\GeoMaestro\data\tibetan.sco"
is, because of my personal setting for DATA, translated into
"DATA++tibetan.sco"
which, when I work with Linux, gets expanded into
"/mnt/win_c/audio/KeyKit/GeoMaestro/data/tibetan.sco"
My composition relying on "tibetan.sco" could thus be shared with someone having another KeyKit installation, as long as he copies "tibetan.sco" into his DATA directory.
By default, only the following paths are handled: DATA, DEFDIR, BASE, SSDIR, SFDIR, COMPOS, MAT, MDOP, TEMPDIR and TOYDIR
You may add any directory to this list by calling the function RegisterPortablePath(). This could be hard-coded in your GeoPostInit().
When programming, you can translate file names with the functions RelativeNameExpression() and FName()
Working with MIDI controllers
(more here later ...)
See also the Ctrl Shaper tool.
Known bugs and issues
Compatibility issues:
- There was a change in KeyKit which make older versions of GeoMaestro incompatible with newer versions of KeyKit. Here is how it goes:
- with KeyKit up to 7.1, use GeoMaestro 1.119
- with KeyKit 7.2 or newer, use GeoMaestro from 1.120
(download page)
- TCP/IP connection with Emacs are (I think) not possible under Linux with KeyKit older than 7.0
GeoMaestro bugs:
- Importing a MIDI file featuring several tempo changes seems broken at times. The problem lies probably in function
ScaleToTempo, but I couldn´t figure it out yet.
- Error messages at the console involving redrawtask in the function traceback can be overlooked: they happen when
FastRedraw is set to 1 if there is a conflict between the redraw task and the current operation. These conflicts should not have any consequence.
- There is no GeoMaestro version correctly synchronised with KeyKit 7.0h: if you do try this combination, you may get errors at start-up
KeyKit bugs:
- TCP/IP stuff is broken (at least for windows XP) in KeyKit 7.2a to 7.2g
- On versions before 7.2, file names featuring
"\x" e.g. "c:\homes\xanadu" are not properly handled
- pull-off menus from kvalbuttons are not properly restored when a page is read (they lose track of their parent object). GeoMaestro GUIs use hacked kvalbuttons (called GMkvalbuttons) that can be written and restored when pull-off, but if you want this feature available you need to install a specific file somewhere in your Keypath: see here for details.
- when a page is read (page -> read), all its objects identifiers (the $ numbers) have their value increased, more or less (this depending of the objects already existing at the time the page is read) in order to make sure a same id is not used twice. If later this same page is saved (page -> write), the ids are NOT decreased. As a consequence, reading/saving a same page many times eventually leads to very large ids, and at some point you cannot read the page any more. This is bad. So a hack is provided here: if you install kklib_hacks.k, the ids numbers will be checked when saving a page, and reduced if they are too high. This way you can read/write infinitely the same page.
If it's too late and you already can't read a given page anymore, type this at the console to manually fix the problem:
page_objids(pagename)
... where pagename is the name of the page (with its full path).
with KeyKit v6.6b (an old version that you should not use anymore :)):
- a little hack is necessary for the ACPATCHES system to work properly:
- in file lib/keyrc.k , line 60, replace ACPATCHES = 0
with if (!defined(ACPATCHES)) ACPATCHES = 0
- in file lib/wprogch.k, line 32 , replace realtime(LiveAC[ch]=PourAC(ACPat[pn]["lsb"],ACPat[pn]["pat"],ch))
with realtime(PourAC(ACPat[pn]["lsb"],ACPat[pn]["pat"],ch))
- the split() function does not work with a string of length 128; this KeyKit function is heavily used in GeoMaestro, so you can encounter this problem. If you get error messages while doing something involving a long command or the reading/writing of a file, check that you are not using strings that are exactly 128 characters long (of course, it can be that the length of 128 happens at an intermediary stage in a calculation, so you won't be able to localize it). You can also try to add spaces in commands (or file lines) to change their length. The best solution being to upgrade KeyKit...
-- Back --