GeoMaestro
Tutorial 5: playing with distortion functions
Basics
Using Volume, Pit and Dur
The ChooseDF plug-in
Angular distortions
Using Pan
Using Time
Using Mer
Using CScore
Setting distortions from the projector call
Basics
The principles and internal implementation of distortion functions are described here. You should have read this before going on.
An informal overview of the scene/projector/distortion scheme can be found in this paper.
You may get a feeling of the importance of distortions settings by playing with the "Distortion" demos provided with the system.
Also, tips for writing your own functions are there.
Using Volume, Pit and Dur
Throughout this tutorial, we will use the "show distortion" mouse mode of the main GUI to display the distortion functions.
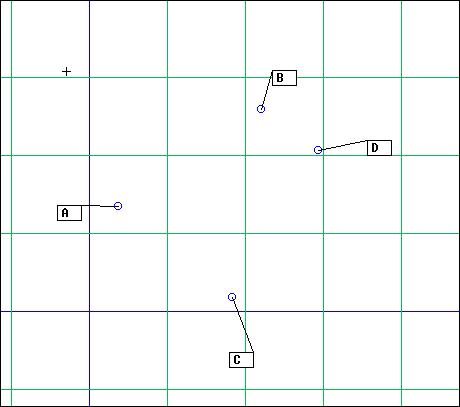
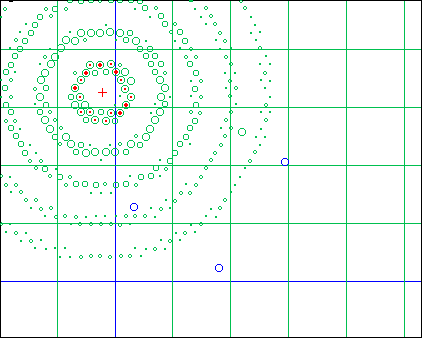
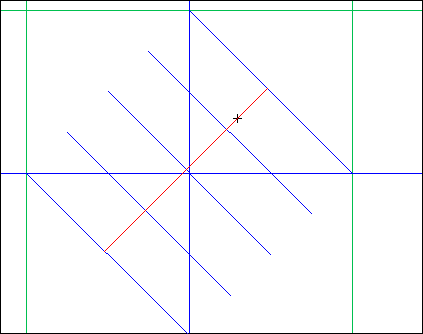
Let's make a dummy scene: click on [new] and confirm to erase the current scene, then use the "Clavier" plug-in to create an event in channel 1, with nodur 'a' and set the display so that we have some room around it, then create four point A, B, C and D so that the overall thingy looks like that (you won't have the comment flags, though):
Now check that no distortions are defined: click on [fn], then on [current]. At the console you should see this:
Vol: NoChanges  >args>
Pit: NoChanges  >args>
Dur: NoChanges  >args>
Time: NoChanges  >args>
Pan: NoPan  >args>
Mer: NoMer  >args>
CScore: KeepScore  >args>
If it is not the case, use the distortion functions menu and the [Vol, Pit, Dur, Tim, Pan, Sco, Mer] menu to set the distortions to nil (use the arrow button in between to perform the association, and enter "-" when it asks for parameters)
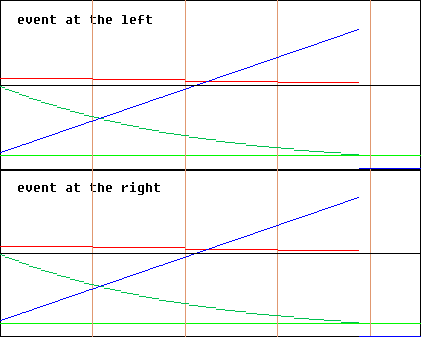
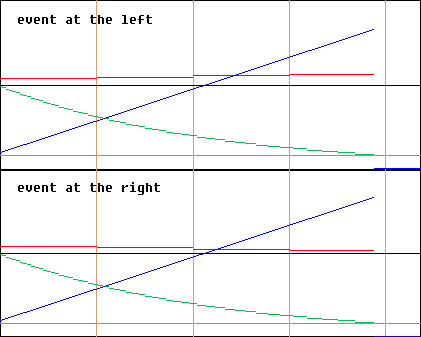
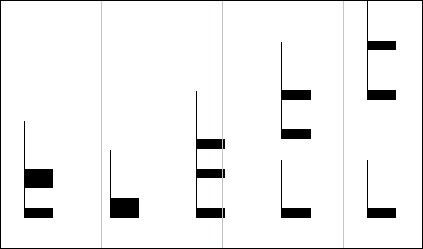
Now if you select the "Show distortions" mouse mode, click on the event and drag across the graphic area, you should see this:
These graphs show how the nodur attributes are distorted according to the distance and the projection side. The brown vertical bars represents GeoMaestro units (one bar every 1 or 10 units, depending on the scale)
In our case, since there are no distortions, we simply get horizontal lines:
- the red one is the pitch (69 since the nodur is 'a')
- the green one is the volume (63)
- the blue one is the duration (96); it uses another scale that you can tune using the DURDISTSCALE parameter
- the black one is the time offset (0); it uses yet another scale defined by the TIMDISTSCALE paramete
- the lighter green line shows the value of SILENCE: when the volume is less than SILENCE, the event will not be projected.
Now, from the GUI projector buttons, create a ligne
Echelle(A, C, B, D, 5)
and display it ( [display] "ú1" if it's the fist ligne you have):
Click on [snarf] and type
:Snarf
...at the console: you should have as a result something like:
'at81, at526, at580, at1450, at1937, l2081'
No distortion, so the rendered ligne keeps the nodur intact for each projection, and we have only 'a's in the final phrase. So far so good.
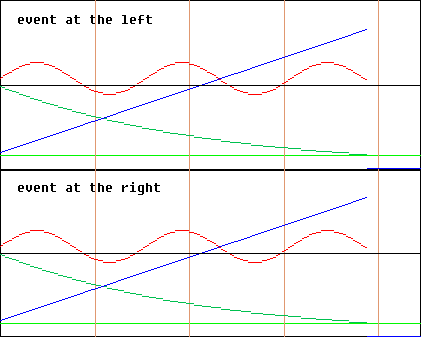
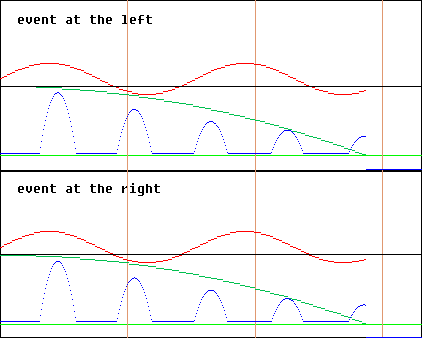
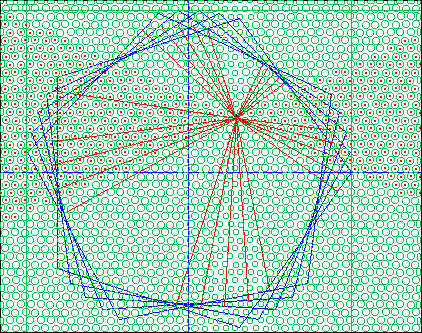
Now let's start the game: set [Vol] to [Vexp] (with parameter "1.5"), [Pit] to [BassesAuLoin], [Dur] to [DurPlusDist] (for both functions we'll stick to the default local parameters, so enter "-" every time)
then click on the event and drag accross the area; now we have this:
(note how all curves stop when the volume value reaches SILENCE: there is no more projection then)
[redo] ligne 1, [snarf] it and type again
:Snarf
... this time the result is more complex; the one I have (it will be different for you) is:
'cd443v26t81,b-o2d52v21t526,a-d595v17t980,dd666v14t1450,fd729v12t1937,l2081'
You can check that each note in this phrase corresponds to the distorted nodur by doing a "show distortion" along the different red segments. At the console you should have the same values as in the phrase.
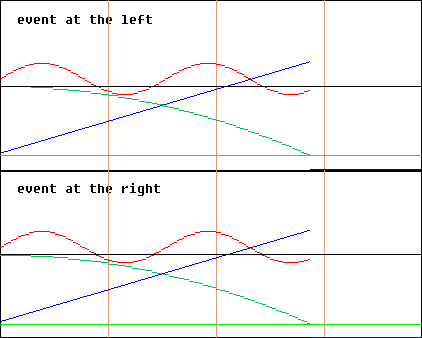
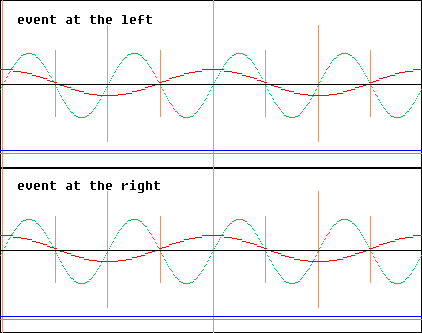
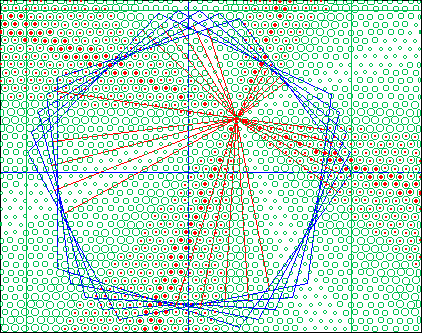
The functions we used do not care about the side of projection, that's why the upper and lower graphs are always the same. Let's change that: set [Pit] to [PseuDoppler]. If you drag accross the area, you'll see:
You can see that the pitch now behaves differently depending on the side.
We can observe this difference by creating a new ligne:
Echelle(B,D,A,C,5)
... which uses the same segments as for ligne 1 but read them in the opposite direction, so that the event is now on the other side, projection-wise.
[redo] ligne 1 and check that the resuting phrases for ligne 1 and ligne 2 have different pitches, all attributes being the same (except the time, since the projection now happens backward):
print(RL[1]["ph"]);print(RL[2]["ph"])
The ChooseDF plug-in
So far, we have been using registered distortion functions. It is also possible to "manually" set a function at the console:
Volume[1] = "NoChanges"
or:
Pit[5] = "PseuDoppler"
PitArgs[5] = GetArguments(0.1, 3*12)
In this case the function does not have to be registered in the GUI. It is also possible to set a function by giving its code; the function itself does not have to exist. The ChooseDF plug-in works this way: it defines on the fly a function by coding its action and makes it the current distortion function for a given channel.
Here is a screenshot of its menu:
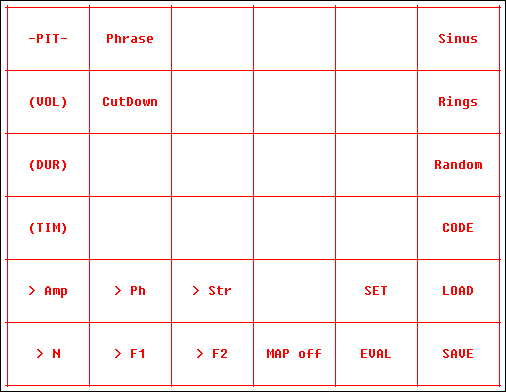
The first four rows display different families of distortion functions. At the very left, you can choose weither the distortion will apply to volume, pitch, duration or time offset (in the picture it's time). The "Phrase" and "CutDown" families of functions only apply respectively to pitch and volume, that's why they are at the left. The families "Random", "Sinus" and "Rings" are generic: they will apply to whatever attribute is selected. "CODE" depends on what expression you defined with "SET" (this will be detailed below)
The six boxes labelled " > .." help define the parameters that some families of functions require. Their meaning is dependent on the function. Usually, Amp is an amplitude factor, N is the number of time something happens and F1 and F2 are scale factors. Ph is a phrase and Str is a string. By selecting the corresponding box you can see their values and edit them.
MAP (on/off) toggles the map mode: if on, the distortion map is displayed after a change (it's the map you have with the "DistMap" plug-in, for a right side event only here)
The group of boxes at the bottom right lets you define a custom function from a simple mathematical expression; we will see that later.
Let's go for an example:
Choose "Sinus" and release the mouse button. At the console there is a message saying "Current plug-in is now SinusDF". Click on the event (so that the plug-in knows wich channel we want to tune) and keep the mouse button down: now the graphic area is divided in 16 parts, corresponding to 16 types of sinuso´ds: you can choose the phase offset and the amplitude you want (change the scale by setting F1). The distance from the mouse to the event will be the sinuso´d period. So drag the mouse about one unit away from the event and release the mouse button. Now a pop-up window appears and asks confirmation for the period value: if you simply press RETURN, it is validated. If you type "n", everything is cancelled. If you type another value for the period, it will replace the one you just defined with the mouse.
Press RETURN: the console displays a message like
Pit[1] set to {return(p1*sin(-Pi/2+d*2*Pi/p2))}
with arguments: [0=48,1=1.05]
which shows you the actual code for the distortion function and its parameters (which you can change later on if you like, in this example by setting PitArgs[1]).
Use the "show distortion" mode as we did before: now you can see the sinuso´dal distortion we just gave to Pit (note that this image is from another example than the code above):
OK now let's play with Volume: select the "Cutdown" box. This is used to give a limit to an event extension: its volume drops to zero at a given distance. Click on the event: this time you have 8 cake-like parts, each one corresponding to a different shape. Drag the mouse somewhere between the points C and D, and note the distance value at the console: in my case it's around 3.14; then go to the "parabolic decrease" section and release the mouse. At the prompt type "3.14" (or whatever value you had). Now the volume will decrease in a parabolic way and get down to zero at the distance of the last segment of the Echelle projector:
Now let's set Dur[1] to rings-like function: select the "(DUR)" box, then the "Rings" one. At the console, you can see that this family of curves will use some of the parameters. So we will set them first.
Click anywhere, but not on the event, so that we leave the RingsDF plug-in (you should have a "Not an event !" message)
Now select the "> Amp" box and set Amp to 500; in the same way, set N to 5, F1 to 0.2 and F2 to 0.8.
This time also select "MAP" so that it becomes "MAP on". At the console type:
DispMapValMin = 96
DispMapValMaxDur = 600
... so that we have a proper range (see here for more)
Then select "Rings" and click on the event: again we have 8 parts corresponding to different rings structures. The four lower ones have a disk in the center, the four upper ones have a hole. The other option is the shape of the rings: steps, smooth steps, parabols or gaussian bell. Choose the hole/parabolic with a little distance parameter (around 0.3), so that we can see all 5 rings:
With "show distortions" it looks like this:
I guess you got the idea: each family of functions have its own plug-in which is called by the ChooseDF one. More of these families are to come in the future. Each one of them will use the parameters in a specific way; and some will be documented while some others won't ! For example, I leave you alone with the "Sinus", "Rings" and "CutDown" functions are they are rather simple.
Now, let's see how you can define a custom function from a mathematical expression:
In the right group of boxes, "SET" displays at the console the current expression and lets you enter a new formula, "EVAL" lets you enter the name of a string variable containing the new formula. "SAVE" and "LOAD" lets you use *.txt files to manage the formulas you want to keep.
The formula itself is what will be in the return() statement of the distortion function: it must be a KeyKit expression evaluating to a float or integer. If you need to make tests in the calculation, use the (test)?(if yes):(if no) compact syntax. The parameters of the expression must be:
d, s, tht, t for the distance, side, angle and time of projection
ph for the event nodur
p1 for the parameter corresponding to the distance set with the mouse (see below)
Example: type this at the console
Formula = "(127-ph.pitch)*s*((d==0)? 1 : p1*sin(d/float(p1))/d)"
..then select the "EVAL" box and enter Formula at the prompt (it would have been the same to select "SET" and directly enter the formula itself at the promt, but it's much more comfortable this way)
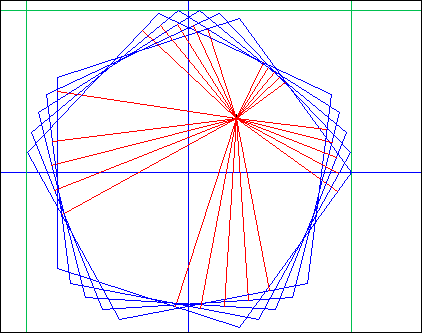
Now select the "(PIT)" box then the "CODE" one: you are now in the CustomDF plug-in mode, ready to set the Pit function. Click on the event: you can see concentric circles around it, 1 unit apart one from the other. Drag the mouse: this set the parameter p1, in the same way as before. Release the mouse: that's it. In my case p1 was about 0.94
Use the "show distortions" mode to see how it looks like
Angular distortions
Consider the following set-up:
There is one single event (a ´f´ note), and the projection is returned by this command:
TPPol(C1,5,0,0.2*Pi,5)
Let's set the distortions as follow:
Volume[1]="{return(25*sin(4*tht))}"
Pit[1]="{return(10*cos(2*tht))}"
Here we used another way to define a distortion function, by directly giving its code (the arguments are ph,s,d,ch,tht,t,p1,p2,p3,p4,p5,p6,p7,p8,p9,p10, see here for more)
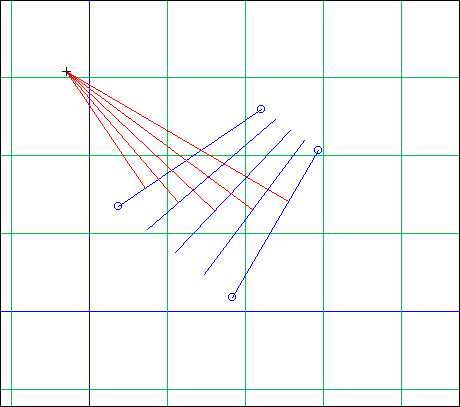
We can see how it looks like with the "angular distortion" mouse mode, similar to "show distortions" with the difference that the displayed is obtained by varying the angle instead of the distance. The initial angle is the one you draw with the mouse. So if we click on the event and drag horizontally to the right, here is what we get:
The DistMap plug-in, with
DispMapValMin = 0
DispMapValMaxDur = 127
DispMapValType = "Volume"
shows how the volume depends on the angle:
... and with
DispMapValType = "Pit"
we can see how the pitch varies:
Here is the resulting MIDI phrase: tut5_ex1.mid
Using Pan
The Pan array is used to set functions which add a pan controller to the projected nodur. So each nodur gets its controller, and this may lead to confusions between events in the same channel since a controller is not tied to a specific MIDI note but to a whole channel.
A distortion function used for panning should return a number from 0 to 127 which will be the pan value itself. While other distortions are added to the nodur values, the pan value is absolute.
Using Mer
Using the Mer array is the more general way to define a distortion. Here is an example where a nodur is expanded into a "chord" depending on the distance:
Mer[1] = "{ph2=ph3=ph;ph2.pitch+=10*d;ph3.pitch+=15*d;return(ph2|ph3)}"
Note that the phrase returned by this function will be merged to the projected (i.e already distorted by the other functions) nodur.
And here is an example where the nodur is replaced with the same kind of "chord" (in this case, the other distortions are not taken into account):
Mer[1] = "{ph2=ph3=ph;ph2.pitch+=10*d;ph3.pitch+=15*d;return([PHs=ph|ph2|ph3])}"
(here PHs stands for the double-quoted string "ph"; it is one of several shorcuts available to simplify the writing of code within strings)
The point illustrated here is that a Mer function returning a phrase ph has ph merged to the distorted nodur, while if it returns an array ["ph"=ph], then ph replaces the nodur and no more distortion (except the score ones) is taken into account.
Using Time
The returned value of a Time function is interpreted as a time offset (in clicks) applied to the nodur.
This can drastically change the behaviour of a projector. Here is a simple example:
The projection is
Echelle(Oi,Ojm,Oj,Oim,5)
... which gives a simple beat. If we keep the settings for channel 1 as defined earlier in this tutorial (with the Mer function in "merge" mode, otherwise no other setting matters), here is the resulting phrase as seen in a group tool:
Now setting
Time[1] = "{return(100*sin(10*d))}"
gives this:
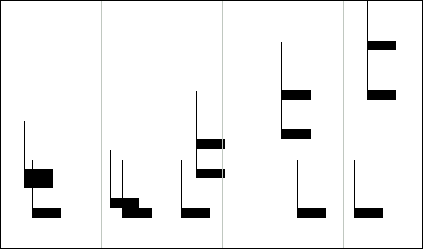
As you can see, the distorted nodur (lowest pitched notes) now have a completely different rythmic structure (the beat is only kept by the other notes, from the chords created by the Mer function)
Using CScore
The CScore array registers an unified type of distortion functions which are applied to the "score" field of an event, if any.
An example is detailed in tutorial 6.
Setting distortions from the projector call
While in standard usage the distortions settings are associated to the scene, as global properties of the event channels, it is possible to define projector-local distortion functions which will override the global ones.
This happens through the optional df parameter of a projector.
-- Back to the tutorials index--
-- Back --